Tag Archives: turnips

Growing, Storing, and Using Fall Turnips


The first day of fall is just a few weeks away! Most planting is done for the season, but you still have time for a few crops in the south, including turnips. These versatile vegetables are one of our favorites for their greens and their sweet, mildly spicy roots. 

Turnip Varieties

At SESE we carry 5 varieties of turnip. They each have their have unique qualities that may help you select one for your garden.

Amber Globe (Yellow Globe) Turnip (63 days)

One of our favorites for fall, this variety dates back to before 1840. These turnips mature in about 63 days and are best when harvested at a diameter of 3 to 4 inches. Their sweet, fine-grained flesh is creamy yellow. 

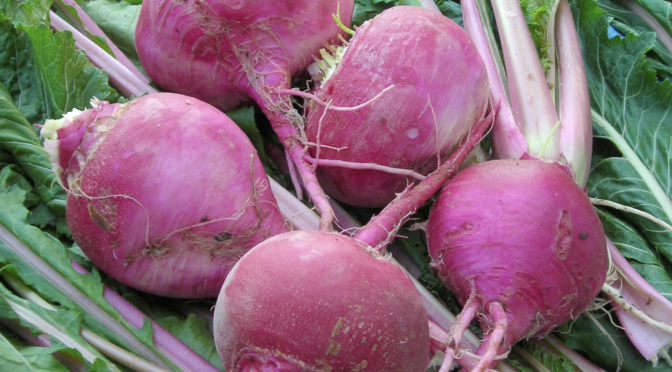
Purple Top White Globe Turnip (50 days)

Purple Tops are our go-to for classic turnip flavor. This variety dates back to 1880 and gets its name because the tops of the roots turn purple where they’re exposed to sunlight. They mature in about 50 days and are best when harvested at 3 inches in diameter or less.

Scarlet Ohno Revival Turnip (55 days)

These lovely scarlet-skinned turnips are a Japanese variety reselected by Frank Morton of Wild Garden Seeds. They produce some round and some flattened roots. The leaves are shiny and hairless with pink and scarlet stems.

This is an Open Source Seed Initiative variety. The OSSI pledge: “You have the freedom to use these OSSI-Pledged seeds in any way you choose. In return, you pledge not to restrict others’ use of these seeds or their derivatives by patents or other means, and to include this pledge with any transfer of these seeds or their derivatives.” Read more about OSSI here.

Seven Top (Southern Prize) Turnip Greens (45 days)

This variety dates back to before 1880 and is grown only for the delicious greens, not the roots, which are woody. It’s a popular southern variety and great winter green. The leaves grow 18-22 inches tall but should be harvested when young and tender.

Included in Slow Food USA’s Ark of Taste. Read more at Slow Food Foundation.

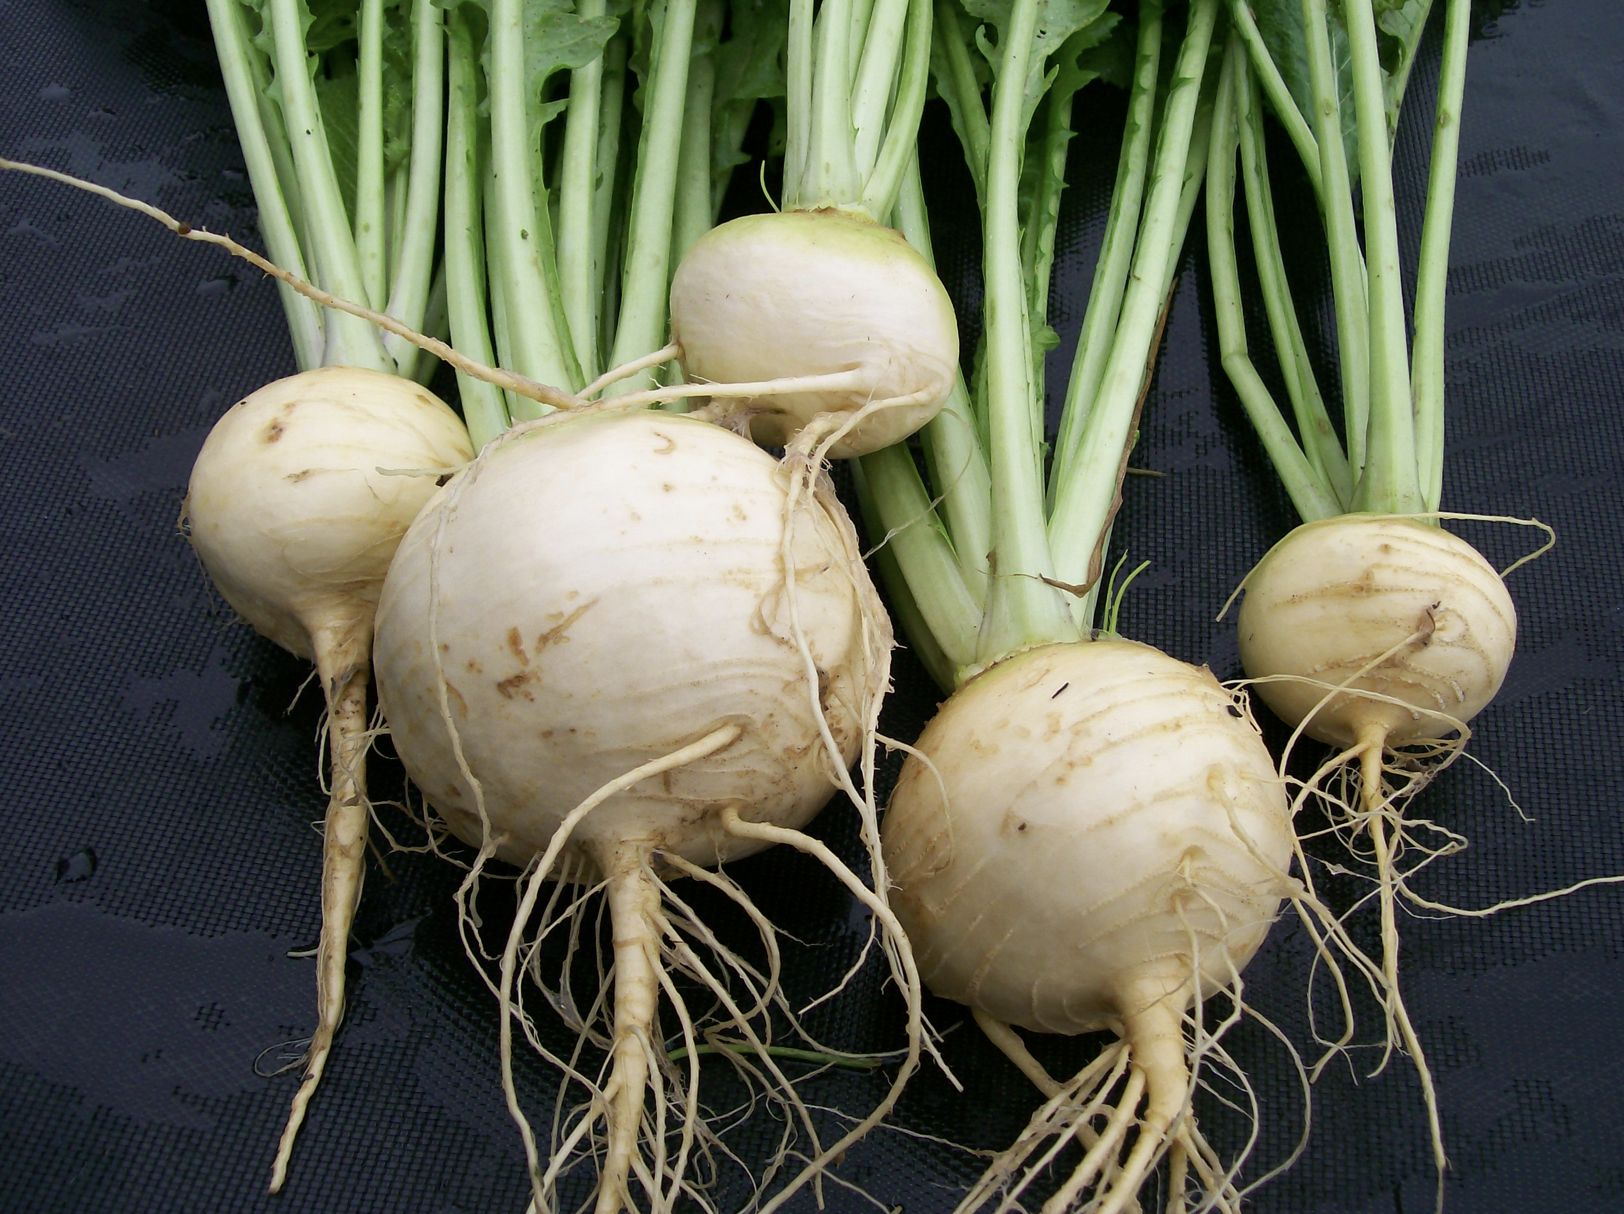
White Egg Turnip (48 days)

Ready to harvest in just 48 days, this fast-growing variety is popular in the south. It’s named for its egg-shaped roots, which grow partly above the ground and have a slight green tint on the crown. It’s a good bunching variety, and the flesh is white, fine-grained, and mild-flavored. 

Amber Globe (Yellow Globe) Turnips

Planting Turnips

The key to great turnips is preparing your soil. You want loose, friable soil to allow roots to expand. We recommend forking your bed and adding a couple of inches of finished compost. We generally recommend against fertilizing. High nitrogen can cause turnips to grow large leaves and tiny roots. 

Turnips should always be direct sown. Sow seeds 1/4″ deep and thin to 2-4″ apart, rows 10-12″ apart. Thinning is essential for proper root growth. Fall plantings should be watered consistently if there isn’t rain, especially as the seeds are germinating.

Keep the beds weed-free and mulch around the turnips with straw, old leaves, or other natural mulch. 

Harvesting

When harvesting leaves, it’s generally best to harvest them when they’re fairly small. They’re best when they’re young and tender, especially if you’re using them raw. Cut leaves about 2 inches above the crown. 

Roots can be harvested at any size but are generally best when they have a 2 to 3-inch diameter. 

For longterm storage, harvest roots after it has been dry for a couple of days. A couple of light frosts can make roots sweeter but be sure to harvest before any hard frosts. Gently pull the roots. You may need to use a fork to avoid damaging them.

Storing

Turnip roots can keep for up to 4 months when stored properly. Brush off as much soil as possible but don’t wash your roots. Any bruised or damaged should be set aside for immediate use.

Using a sharp knife or shears, trim leafy tops to 1/4 to 1/2 inch above the root. Don’t trim root ends or hairs; this invites rot!

Turnip roots store best between 32° and 38°F. A root cellar is ideal but, an insulated outbuilding, cool corner of a garage or basement, or a root clamp can also work. 

They can be stored in various containers, including plastic totes, waxed cardboard boxes, 5-gallon buckets, or even an old cooler. It’s best if there’s some airflow, so avoid putting the lid on tight, and you may even want to drill some additional holes in the container. 

In these containers, you want to keep your roots from touching the container or each other. To do this, you can layer them in damp sand, sawdust, or even old leaves.

You can also store turnips in your refrigerator in the crisper drawer. You don’t want them to dry out, but too much moisture can cause them to mold. It’s best to use perforated plastic bags when storing them in the fridge. Try to set the bags in so that the roots in each bag are in a single layer.

You should check on your turnips every week or two and remove any beginning to soften or rot. The smallest roots generally don’t store as well and should be eaten first. 

Freezing

Alternatively, you can cube, blanch, and freeze turnips. Blanch turnips for 3 minutes, immediately cool them in ice water, drain well and freeze. 

Using Turnips

Depending on what variety you grow, turnips provide two useful and tasty products greens and roots. Turnips roots are generally peeled, sliced, and cooked before using. The leaves can be eaten cooked or raw, especially if they’re young and tender. 

  • Add the leaves and grated roots to kimchi
  • Lacto-ferment slices of the roots to add a tasty crunch to salads and sandwiches.
  • Roast them with a bit of olive oil, seasoning, and other root veggies.
  • Add the young leaves to fresh salads.
  • Use the roots and greens in soups.
  • Grate the roots up for spring rolls and wraps.
  • Sauté the tops as you would other greens.
  • Carve the roots into Jack O’Lanterns! In 19th century Ireland, turnips were the traditional JackO’Lantern and were thought to help scare away evil spirits.
  • Enjoy the greens on New Year’s for good luck.

Fall Harvest: Storing & Preserving Root Crops

Whether you’re on a mission to grow as much of your own food as possible or just love cooking with homegrown vegetables, putting up root crops for winter can be an easy way to keep the winter pantry full. Beets, carrots, fall radishes, rutabagas, and turnips can last several months if stored properly. 

In some cases, root crops can be stored right in the ground. In areas where the ground doesn’t freeze, crops that are maturing just as the growing season ends can be mulched in and harvested throughout the winter. However, this isn’t always possible, and there are other ways to store and keep your root vegetables fresh. To begin:

  1. Harvest carefully.

    It’s best to harvest root crops during a dry period and before any hard frosts. To avoid damaging root crops, you may need to use a garden fork to help loosen the soil.

  2. Brush them off.

    You don’t want to scrub the skin off but you should try to gently rub off as much soil as possible. It’s best not to wash them.

    Any damaged or bruised roots that you find should be set aside to be eaten immediately.

  3. Trim the tops.

    Rotting tops can quickly spread rot to your root vegetables so it’s best to trim them. Using a sharp knife or shears to trim leafy tops to 1/4 to 1/2 inch about the root. Don’t trim root ends or hairs, this invites rot!

  4. Find a place to store them.

    Root vegetables should ideally be stored somewhere cold and moist. Temperatures between 33° and 40°F are preferred. If you’re fortunate enough to have one, a root cellar is ideal, but other options exist. 

    If you don’t have too many roots, you can use the crisper drawer of your refrigerator. Alternatively, a cool corner of a basement or garage will work. You can also use an outbuilding or storage shed in parts of the Southeast as long as you can keep out rodents and you don’t have temperatures below freezing. 

    If you need to store many vegetables and are interested in a DIY project, you can create a root clamp

  5. Place them in appropriate containers.

    If you’re storing roots in your refrigerator, it’s best to use perforated plastic bags. Try to set the bags in so that the roots in each bag are in a single layer.

     Roots being stored in a root cellar or other cold room can be stored in various containers, including plastic totes, waxed cardboard boxes, 5-gallon buckets, and or even an old cooler. It’s best if there’s some airflow, so avoid putting the lid on tight, and you may even want to drill some additional holes in the container. 

    In these containers you want to keep your roots from touching the container or each other. To do this you can layer them in damp sand, sawdust, or even old leaves.

  6. Check on and eat your roots!

    You should check all the root crops you have in storage every week or two and remove any that are beginning to soften or rot. The smallest roots generally don’t store as well and should be eaten first. 
Amber Globe (Yellow Globe) Turnips

Other Preservation Methods

If you don’t want to store your root vegetables fresh or are short on space, there are many other ways to preserve them. These include fermentation, pickling, canning, and freezing. These generally take more time and effort upfront but are great for having vegetables that are quick to prepare or even ready to snack on throughout the winter. 

Fermentation

Lacto-fermentation is a simple, safe, and ancient method of food preservation. All you need is clean, sliced vegetables, a mason jar and lid, a clean rock or weight, salt, and water. You simply ferment your vegetables and any desired spices in saltwater brine. You can substitute sliced root vegetables for the cucumbers in this recipe.

You can also grate them up and add them to other ferments like kimchi. The book Wild Fermentation by Sandor Katz is an excellent resource for those looking to get started or expand their fermentation techniques. 

Pickling

Pickling is a bit more involved than fermenting, but it’s still a safe, easy to preserve root vegetables, even for beginners. Pickled vegetables are canned in highly acidic vinegar, so they can be safely processed in a simple water bath canner. 

There are many recipes available online if you’d like to browse others. Note that any labeled as “quick pickles” are designed to be refrigerated not canned.

Pressure Canning

Without the addition of vinegar, root vegetables are not acidic enough to be safely water bath canned. This means if you’d like to can plain root vegetables you’ll need to use a pressure canner. It’s not as scary as many people think!

PennState Extension has instructions for pressure canning vegetables here. Always follow the instructions that came with your canner.

Freezing

If you have room in your freezer, this can be a great way to keep root vegetables. They generally freeze well and maintain good texture and flavor. 

Like other vegetables, you must blanch root veggies before freezing; otherwise, they will get mushy. You can find directions for freezing all kinds of vegetables over at the Pick Your Own website. 

Tips for Direct Sowing in Hot Weather

Lisa Dermer & Ira Wallace

Last week we finished harvesting our spring-planted cabbage and broccoli. Now it’s time to sow our first seedling bed for our fall brassicas: besides cabbage and broccoli, we’ll add cauliflower and Chinese cabbage. Later we’ll make sowings of fall carrots, beets, lettuce, rutabaga, turnips, and greens like spinach, chard, kale, and mustards.

Sowing outdoors during high heat can be tricky, but if you follow these tips you’ll find it’s worth the effort:

1. Sow in a closely-spaced nursery bed and transplant later. This lets you concentrate your efforts (keeping the soil moist and weed-free) on a small, more manageable area. (Don’t do this for crops that don’t transplant well, like carrots.)

2. Choose a location with afternoon shade. This will protect the sprouting seeds from drying out.

3. Sow under lightweight row cover or the newer temperature-neutral proteknet. Both protect from insect pests and help retain soil moisture.

4. Sow successions! Two weeks after your first sowing make another planting of the same varieties or other, earlier-maturing types.

5. Count backwards. Plan for cool-season crops to mature when cool weather hits, and use the days to maturity to plan when to sow.

6. Transplant and/or thin your plantings. Giving plants more space helps their roots access enough moisture. Young seedlings grow faster in hot weather, so plan for quick turn-arounds. Summer-sown brassicas may be ready to transplant in 4 weeks or less (they should have 3 true leaves).

Check out our Fall and Winter Quick Reference for more details about timing and what to plant for fall and winter harvest.

Order now if you haven’t already reserved your planting stock for garlic and perennial onions. Each order comes with a Garlic and Perennial Onion Growing Guide to get you started.