It’s hard not to love the birds that visit our yards and gardens. We love them for their beauty, their cheerful melodies, and because they’re a joy to watch. Many birds can also help you have a more productive garden. These are five of the many species native to the eastern U.S. that play important ecological roles in the garden.
Eastern Bluebirds
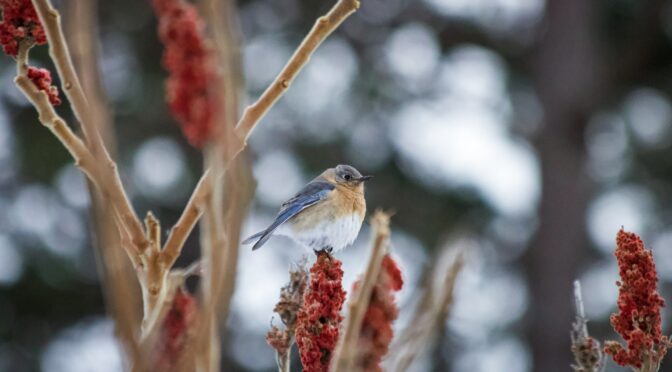
These stunning little beauties (seen above) are workhorses in the garden! They are heavy feeders, especially during the nesting season. Eastern Bluebirds (Sialia sialis) eat a variety of insects that would otherwise be feeding on your plants. They can be found throughout much of the Eastern U.S. year-round in woodlands, farmlands, and orchards.
Populations of Eastern Bluebirds have seen severe declines primarily due to competition with House Sparrows and Starlings for nesting sites. To attract them to your garden and give them a helping hand, you can create or purchase Blue-bird specific nest boxes. These nest boxes should have an entrance hole 1.5 inches in diameter. This size is large enough for the Eastern Bluebird but too small for many other species.
You can also make your garden more attractive to them by adding a birdbath or other clean water source. Additionally, you can stock feeders with mealworms and plant sumac or elderberry, providing some of their favorite meals.
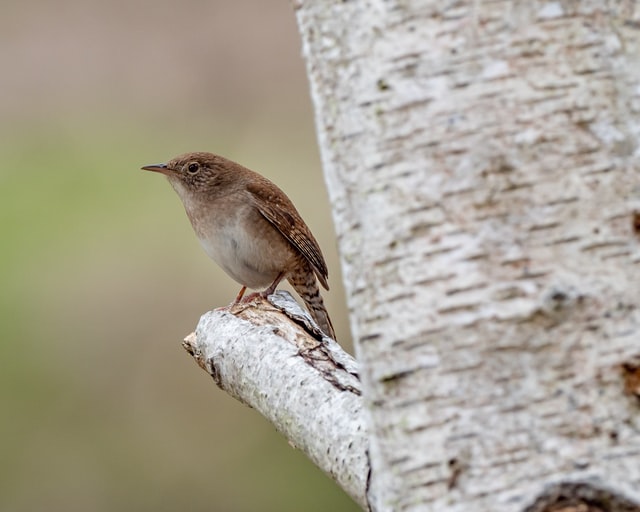
Odds are you’ve seen a House Wren. They earned their name from their tendency to nest around human homes or in backyard birdhouses. While they lack the Bluebird’s vibrant colors, their cheerful personality and beautiful, bubbling song makes them just as fun to have around.
During the spring and summer, you can find House Wrens throughout most of the eastern United States. They can be found year-round in parts of South Carolina and farther south. They feed on a wide range of insects, including moths, caterpillars, beetles, flies, and other troublesome pests!
As cavity nesters, House Wrens will use a variety of human-made birdhouses. You can upcycle old watering cans or scrap wood into suitable wren houses. You can also help them feel more comfortable in your garden and yard by planting dense shrubs or leaving some thick natural areas for them to use as shelter. If you have woodlands, leaving standing dead trees also helps make more natural cavities available for them and other birds.
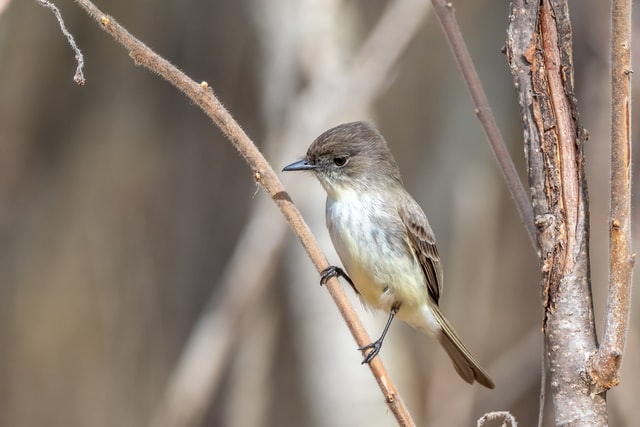
You may already be able to recognize these birds by the call they’re named for, which sounds like “fee-be.” They also have the adorable habit of bobbing their tails when perched. Like the House Wren, they spend at least the spring and summer in most of the eastern United States and may also be seen year-round in the Southeast. They are some of the earliest birds to move north each spring. They’re common in woodlands, farmlands, and suburbs and are often spotted nesting under bridges and in eaves and rafters.
Phoebes are members of the family of birds known as the “flycatchers.” They catch most of their meals out of midair, feeding on flies, wasps, beetles, and other insects. They will also hover to grab bugs off foliage or drop to the ground to quickly grab an insect.
Eastern Phoebes are in decline in much of their summer range. You can help preserve this species and invite them to your garden by building appropriate nest boxes. You can find plans here. Be sure to get boxes up early! They also eat berries, so planting a few sumacs or elderberries can help attract them.
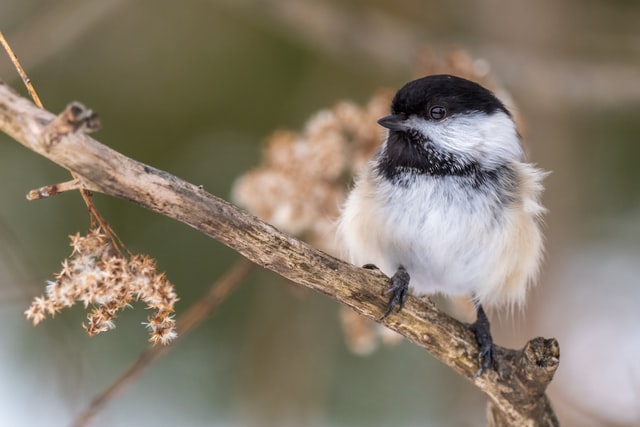
Three different species of Chickadee call the eastern United States home. The Boreal Chickadee (Poecile hudsonicus) is only found in northern New England and into Canada though it has occasionally been spotted farther south. The Black-capped Chickadee (Poecile atricapillus) is found in the mountains of West Virginia and farther north, while the Carolina Chickadee (Poecile carolinensis) is found in southern Pennsylvania down to the middle of Florida.
All of these species are omnivorous and will feed on insects throughout the year. Having them around can help keep pest populations low. They’ll hunt insects in your garden during the summer and find them in bark and dead plant material in the winter.
Thankfully chickadees are easy to attract to your yard. They’ll visit clean birdbaths and other water sources. Planting berry bushes like elderberries and seed crops like sunflowers are great ways to provide food for them. They’ll also readily visit feeders and particularly enjoy sunflower seeds, suet, and peanut butter. You can also help provide chickadees with protection from wind, rain, and snow by planting evergreen shrubs and other dense plants.
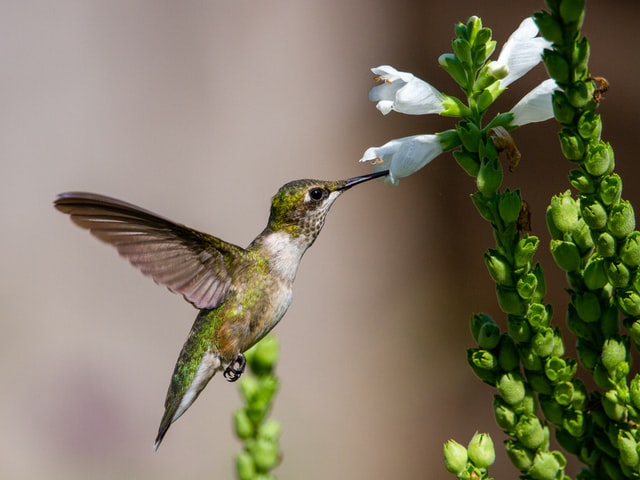
Of course, I couldn’t leave the Ruby-throated Hummingbird off this list. They’re stunning, will help pollinate your plants, and eat various small soft-bodied insects, including gnats, aphids, fruit flies, and tiny spiders. The Ruby-throated Hummingbird can be found throughout the eastern United States during the summer and year-round in parts of Florida. They’re commonly seen in gardens and woodland edges.
You can attract these hummingbirds by putting up feeders or planting tubular or trumpet-shaped flowers. If you decide to use a feeder, you should use appropriate food (no red dye!) and clean the feeder often. You can find great information about feeding hummingbirds in this Audubon Society article. Great flowers to plant for these birds include cardinal flowers, sunflowers, bee balm, echinacea (coneflower), Jewelweed, Milkweed, and Fuchsia. You can also add flowering trees such as Flowering Dogwood or Crabapples to your yard.
One of the best things you can for any bird species is to stop using pesticides in your garden. Pesticides can make birds sick when they consume insects that have come into contact with these chemicals.
You can also leave a few wild areas. Sometimes the “untidy” areas of your yard or woodland are the best for sheltering and feeding small birds. Keep this in mind when you have the urge to clear brush, dead trees, and dead plant material.
Lastly, you should plant native species. Native flowers, trees, and other plants help provide habitat and food for a wide variety of native birds.
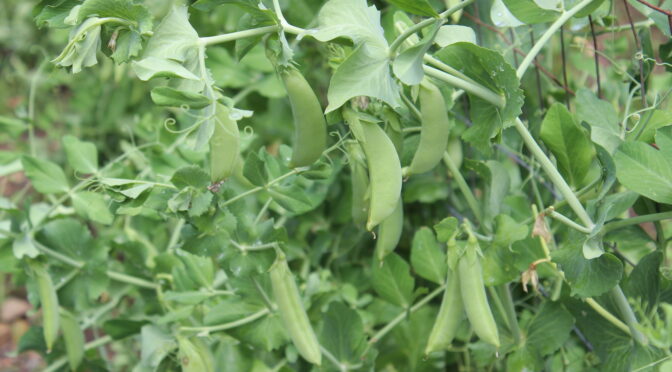
If you’ve been gardening for a while, you’ve probably heard that beans, peas, and other legumes are nitrogen-fixing, meaning that they add nitrogen to the soil as they grow. However, many gardeners are less aware of exactly how this process works.
This process is a symbiotic relationship between legumes and specific types of bacteria called Rhizobacteria. These bacteria cause legumes to grow nodules on their roots. The bacteria live on the nodules and get carbohydrates from the plants. In return, the bacteria take nitrogen from the air and convert it to a form that is accessible to the plants.
Why do I need to inoculate? Doesn’t this bacteria occur naturally?
Rhizobacteria do occur naturally in some soil. However, there may be little to none present, particularly if you haven’t grown legumes in that area for several years. Legumes perform better with more bacteria present.
If you’ve ever had legumes fail to thrive, a lack of rhizobacteria may be part of the problem. Adding inoculant will ensure that there’s enough present to perform nitrogen fixation.
Using legume inoculant can:
Improve vigor and health of legume plants.
Improve yields.
Increase nitrogen available for other plants.
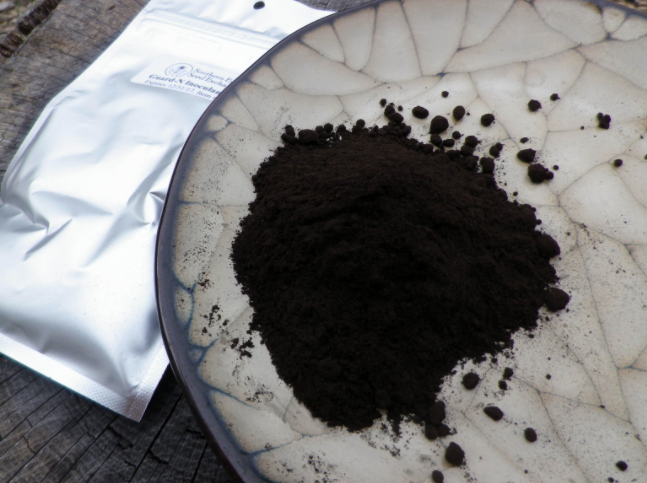
Guard-N Inoculant
How do I inoculate my legumes?
Inoculating legume seeds is very simple. All you need to do is moisten your seeds and dust them with a bit of inoculant. You should plant them within 24 hours of inoculating.
We provide full instructions as well as more information on the Guard-N Inoculant we carry here.
The inoculant mix we carry at SESE contains Bradyrhizobium sp. (Vigna), Rhizobium leguminosarum biovar viceae, Rhizobium leguminosarum biovar phaseoli, and Bradyrhizobium japonicum. It can be used with:
Garden peas, including shelling, snap, and snow peas
Sweet peas
Lima beans
Soybeans
Fava beans
Southern peas
Asparagus beans
Common beans such as snap beans
Peanuts
Sunn hemp
Vetch (Vicia sp.) including Hairy Vetch, but not Crown Vetch.
Late Spring Sale
We’re currently having a late spring sale. Our Guard-N Inoculant is 20% off! Order yours today to ensure that your beans, peas, peanuts, and other legumes thrive this season.
It can be easy to grow the whole rainbow in flower gardens, but you can do it with vegetables too! Growing a rainbow vegetable garden is fun whether you’re 5 or 55!
It can also be educational for children. It’s a fantastic opportunity to discuss light and rainbows, nutrients, and eating a balanced diet, as well as heirloom seeds!
Here are a few varieties you could use to grow your own rainbow.
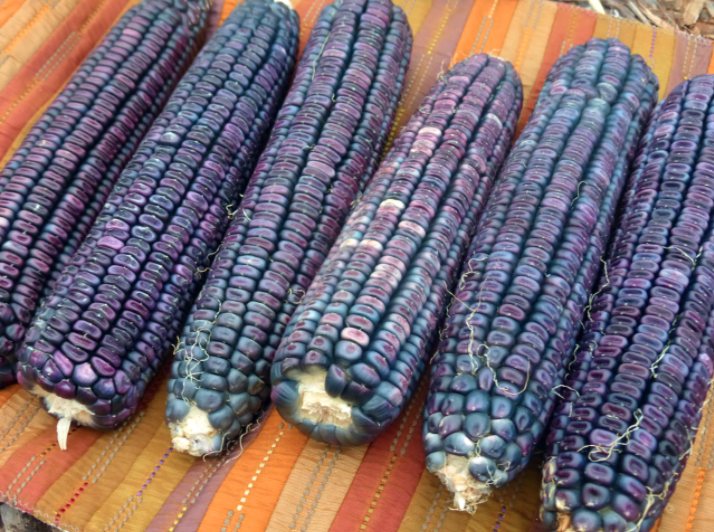
This gorgeous red dent corn is a Virginia variety that dates back to 1845! The stalks grow 10-12 ft. tall and produce two ears per stalk. Bloody Butcher is great for flour, cereal, or roasting ears and makes excellent cornbread.
An Italian heirloom from the Tuscany region, this tomato was one of the most heat tolerant and productive varieties in a 2011 U. of Georgia trial. It’s richly flavorful for sauces and stuffers or just slicing!
Prior to the Civil War, one of the most commonly grown and best-documented tomato varieties in the country. Listed in the 1843 Shaker seed catalog at New Lebanon, NY, the Large Red tomato is vital for antebellum garden recreations and historic farms. Fearing Burr in his 1865 book stated, “From the time of the introduction of the tomato to its general use in this country, the Large Red was almost the only kind cultivated, or even commonly known.”
We introduced Large Red for historical reasons, but we were surprised and pleased during our 1996 trials to find that it became a favorite of a local restaurant’s chef.
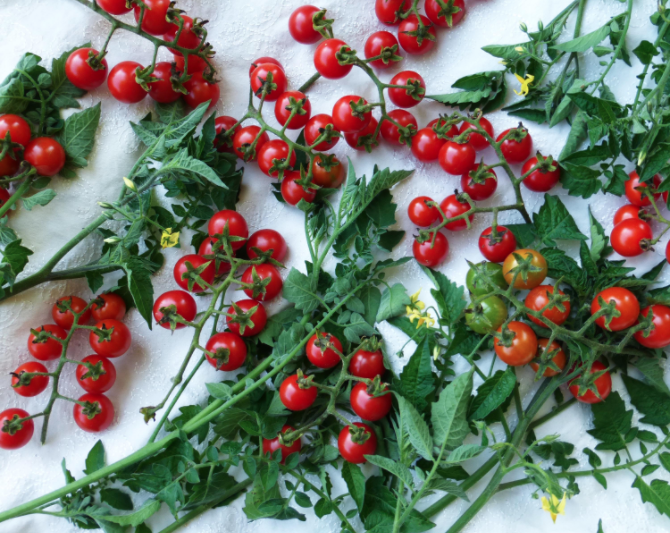
Always a favorite at our tomato tastings, Matt’s Wild is from seed collected in the wild near Hidalgo in eastern Mexico. The plants bear loads of intensely sweet, tart, and flavorful, ½ in. deep red cherry tomatoes. They are vigorous, disease-resistant, and sprawling, and self-sow readily.
The Detroit Dark Red Beet dates back to 1892 and was developed from the popular variety Early Blood Turnip. It’s a widely adapted, very popular dark red beet that’s resistant to Downey Mildew.
NASA chose this stunning red lettuce for space farming. In August 2015, Outredgeous became the first vegetable grown and eaten on the International Space Station!
It was bred by Frank Morton of Wild Garden Seed. Outredgeous has intensely dark red, slightly ruffled leaves that form loose heads.
A beautiful addition to any garden, Ruby Red is worth growing for the color alone. The foliage is dark green on ruby-red stalks. It’s more frost tolerant than other chards, and the plants are especially striking in cold weather.
An excellent carrot variety, Danvers is widely adapted, productive, and heat-tolerant. The dark-orange roots grow 6-7 inches long and 2 inches at the shoulder, tapering to a blunt point. They’re especially suited to growing in clay soil, and the strong tops aid harvesting.
Danvers is a good storage variety. These and other carrots can also be dehydrated and ground to create natural food coloring powder.
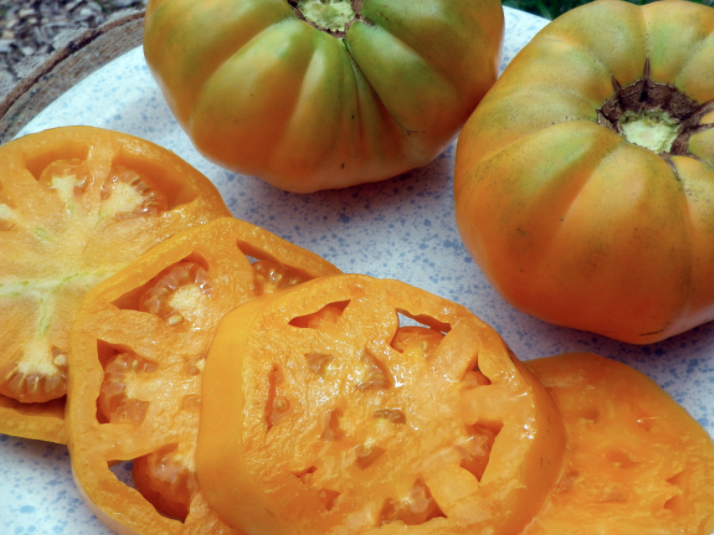
These 1-2 lb orange beefsteaks are delicious and perfect for a tomato sandwich! This variety is a West Virginia family heirloom that was passed to Darrell Kellogg of Redford, MI, who selected and named it.
This pre-1700 cultivar of Native American origin is still the most popular variety of large Halloween pumpkins. Also called Big Tom or the Yankee Cow Pumpkin, it produces 15-20 lbs fruits that are bright orange, slightly ribbed, and vary in shape and size.
It’s good for canning, baking, and pies. Try making pumpkin spice waffles!
Roughly translated as “Southern Unrefined,” Cateto Sulino produces ears up to 8 in. on 5-8 ft. stalks. The kernels are such a bright orange, inside and out, that Farm and Sparrow bakery in North Carolina says it’s caused customers to ask why they’d put cheddar cheese in the bread they’d baked using it!
Cateto Sulino is a blend of Argentine and Uruguayan landraces, selected in Tennessee by Joshua Gochenour for insect resistance, virus resistance, and bright orange color that indicates high carotene content. You can find more information on the history of this corn in its product description.
One of our personal favorites for its rose orange color and rewarding flavor, it produces beautiful persimmon-colored, rose-orange fruits. The fruits are typically 12-16 oz though early ones can weigh up to 2 lbs. The plants are well-branched, vigorous vined, and Late Blight Tolerant.
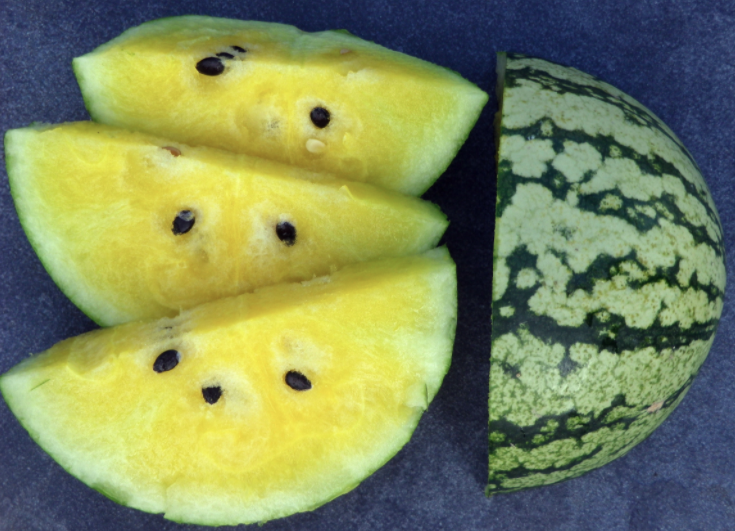
Renick Yellow offers high yields of small melons with sweet yellow flesh. It has much tastier rinds than most watermelons have. This unique variety comes from the Renick Family of Ashville, OH, via Linda Roberts, Bill Ellis, and SSE. It was introduced in 2020 by SESE.
Introduced by SESE 2018, this pepper is fruity and flavorful, with medium-high heat. It’s a heavy yielder and a favorite in our 2016 pepper taste test. Aji Chinchi Amarillo ripens from green to golden yellow.
Aji Amarillo peppers are a key ingredient in Peruvian cuisine. This rare “Chinchi” strain bears smaller peppers, about 3 × ½ inches, much earlier in the season than the standard Aji Amarillo. Thanks to Chris Watson for providing our seedstock.
This variety grows wild in Veracruz, Mexico! It produces ½-inch pale yellow fruits on vigorous plants. The fruits are very sweet with unusual flavor overtones, including notes of vanilla. It was a favorite in our 2015 tomato tastings.
Our earliest tomatillo and one of our sweetest, it produces heavy yields of 1½ inch cheerful yellow fruits plus an occasional cheerful purple fruit. It comes from the collection of Dr. John Wyche of Hugo, OK, one of SSE’s earliest members.
Lemon Cucumber is an excellent, never-bitter, old-fashioned cucumber flavor with a hint of nuttiness. It produces 7-foot vines covered with crunchy round yellow fruits. Harvest cucumbers at 1½ inches for pickling or 2 inches for salads.
Buhl produces 6-7 foot stalks that bear two ears of amazingly uniform sweet yellow corn of superior quality. You’ll have to fight the raccoons to enjoy it! It comes from Sandhill Preservation Center via SSE member B.W. White 1981.
A heavy yielder of light yellow pods, this bean has the unusual characteristic of tasting somewhat like mushrooms when cooked. Tender when picked at 5 inches, this bean is a true treasure. The original seed came from Marge Mozelisky, given to her by her grandmother.
The emerald flesh of Green Zebra has good flavor. The 3-5 oz fruits ripen to yellow-gold with alternating dark-green zebra-like stripes and are gorgeous sliced or in salads. Well branched vines provide good foliage cover and have some resistance to septoria leaf spot.
This variety was developed in 1985 by Tom Wagner and was chosen by Alice Waters for the famous California restaurant Chez Panisse.
This is one of the best-tasting green tomatoes anywhere! It produces 8-12 oz fruits with green flesh and green-yellow skin with amber to red color on the blossom end.
Cherokee Green was selected from Cherokee Purple tomato by North Carolina grower Craig LeHoullier. It’s an Open Source Seed Initiative variety.
A highly productive variety, Cisneros Grande produces large fruits up to 2½ inches making for easy harvest and processing. Most fruits ripen to yellow, while some stay green throughout. Fruits average about the size of a golf ball.
For a tart salsa, use the bright green fruits while the husk is still green; for a sweet and fruity flavor, wait until the husk dries. Plants grow 4-6 feet tall.
Marketmore 76 is an excellent high-yielding, 8-inch, bitter-resistant cucumber. This dependable variety grows well in the Mid-Atlantic region as well as the North and is a good choice for market and home gardeners alike. The dark green fruits are white-spined.
Black-Seeded Simpson dates back to 1850 but is still a popular variety! This old standard is one of the earliest loose-leaf types. It’s good for early spring planting for the first lettuce of the season, but quality declines in heat or late plantings.
A 1920 Ohio heirloom, this variety was selected from “Rotten Clarage.” It’s a highly uniform, semi-dent corn. Blue Clarage produces solid blue, two 8-10 inch ears on each sturdy 10 foot stalk. It has excellent Corn Rootworm resistance and tolerates crowding and smut better than many other open-pollinated corns.
Originally developed as a meal and feed corn, it has a higher sugar content than most dent corns and may be used fresh in the milk stage. As cornmeal, it has a sweet flavor. It mills easily and makes speckled blue and white flour, but white flour is obtained if the bran is sifted out. Older farmers who use this corn to feed chickens claim that the chickens will eat more, lay more eggs, and put on more meat.
A beautiful blue and white corn with a red cob, Cherokee White Eagle occasionally produces an all-blue ear. Some people can see the image of a white eagle in the kernels! This variety produces 8-10 foot tall stalks, mostly two ears/stalk, and 6-7 inch stocky ears. It was the first variety deposited in the Cherokee Nation Seed Bank!
Borage is a bushy herb with bright blue edible flowers. It’s a good choice for attracting bumblebees and other pollinators to garden plots. The plants fade in the deep summer heat and humidity but can be reseeded for late summer/early fall harvest.
The leaves can be used sparingly to add a cucumber-like flavor in salads or for flavoring cool drinks. Medicinally, the seeds contain over 20% GLA (gamma-Linolenic acid), which is extracted and used commercially as an economical substitute for evening primrose oil.
Vates Collards have stunning large blue-green leaves with good flavor. It’s slow bolting and produces high-quality frost-resistant greens especially suited to the Mid-Atlantic and the South. Plants grow up to 32 inches tall.
Developed in 1957, these productive purple beans have a natural blanching indicator. When prepared for freezing, the purple pods blanch to green after 2 minutes of boiling. They’re easy to pick too! The purple pods are easily visible against the green foliage.
The plants have short runners and need either wide row spacing or a fence for climbing. They produce 5-inch pods that are slightly curved. They’re very meaty and flavorful, great for vegetable soup. The buff-colored seeds germinate well in cool soil.
Red Acre produces beautiful, round, 5-7 inch reddish-purple heads that weigh about 3 lbs. The heads may sunburn in hot weather, so best for early spring and fall crops.
It adds festive color to coleslaw and is an excellent storage variety with resistance to cabbage yellows.
Did you know that carrots were predominantly purple for the first few hundred years of their managed cultivation? Yellow and purple carrots were first recorded in Asia Minor in the 10th century.
Cosmic Purple produces purple-skinned 7″ carrots, orange and yellow flesh. They’re spicier than regular carrots; great for adding color to salads and stir-fries.
Black Brandywine is a stunning tomato to add to your garden! It produces large dusky rose/purple fruit with rich, sweet flavor and good yields.
Black Brandywine is a 1920s Pennsylvania heirloom. It’s a cross between Brandywine and Fejee Improved tomato. William Woys Weaver’s grandfather obtained seed from the breeder, Dr. Harold E. Martin.
This Taiwanese variety produces shiny deep lavender fruits that can grow to 11 inches or longer. If plants are kept upright, the fruits can be kept straight for over ¾ of the length, making for impressive filets.
Ping Tung Long is a disease-resistant and high-yielding variety, producing over 20 fruits per plant in our garden. It also has excellent flavor.
The Purple Bumble Bee Cherry Tomato produces striking 1½ inch cherries, dusky purple with vivid lime-green streaks. They have a nice balance of sweetness and flavor. The tall, vigorous plants bear til frost. This tomato is widely adapted and has good splitting resistance.
This small kernelled variety makes surprisingly large pops, yielding a low hull/ corn ratio. It has great flavor and is highly ornamental. The 5-7 inch ears have many shiny colors, including red, blue, orange, white, and yellow. Stalks grow 6-8 feet tall.
The seedstock came from Merlyn Niedens, combining several strains of long ear Cherokee popcorn sent by Carl Barnes of Turpin, OK. Carl has helped save many of the Cherokee corns that came west over the Trail of Tears.
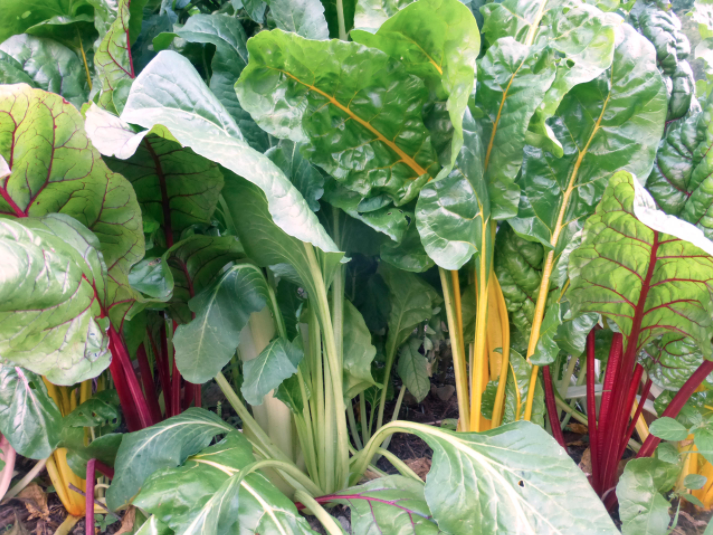
Rainbow Chard must grow if you’re looking for colorful plants! Originally from Australia, a multicolored rainbow of plants with stems in shades of red, orange, pink, yellow, and creamy white.