If you’ve been gardening for a while, you’ve probably heard that beans, peas, and other legumes are nitrogen-fixing, meaning that they add nitrogen to the soil as they grow. However, many gardeners are less aware of exactly how this process works.
This process is a symbiotic relationship between legumes and specific types of bacteria called Rhizobacteria. These bacteria cause legumes to grow nodules on their roots. The bacteria live on the nodules and get carbohydrates from the plants. In return, the bacteria take nitrogen from the air and convert it to a form that is accessible to the plants.
Why do I need to inoculate? Doesn’t this bacteria occur naturally?
Rhizobacteria do occur naturally in some soil. However, there may be little to none present, particularly if you haven’t grown legumes in that area for several years. Legumes perform better with more bacteria present.
If you’ve ever had legumes fail to thrive, a lack of rhizobacteria may be part of the problem. Adding inoculant will ensure that there’s enough present to perform nitrogen fixation.
Using legume inoculant can:
Improve vigor and health of legume plants.
Improve yields.
Increase nitrogen available for other plants.
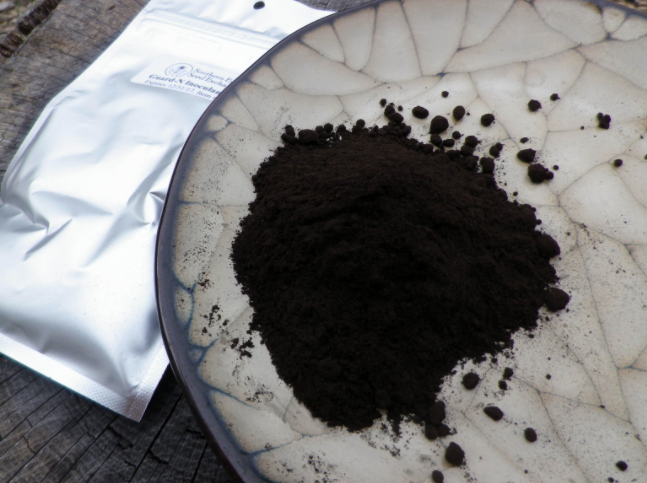
Guard-N Inoculant
How do I inoculate my legumes?
Inoculating legume seeds is very simple. All you need to do is moisten your seeds and dust them with a bit of inoculant. You should plant them within 24 hours of inoculating.
We provide full instructions as well as more information on the Guard-N Inoculant we carry here.
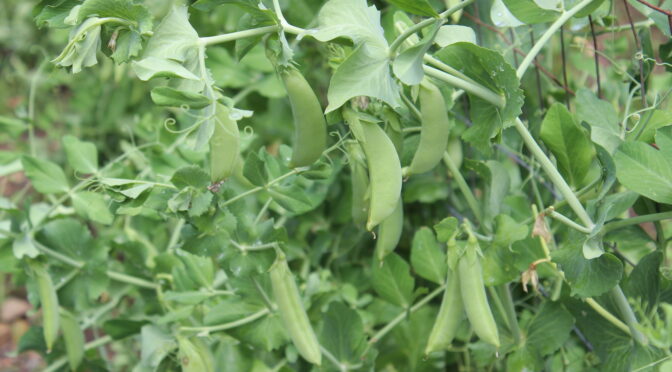
The inoculant mix we carry at SESE contains Bradyrhizobium sp. (Vigna), Rhizobium leguminosarum biovar viceae, Rhizobium leguminosarum biovar phaseoli, and Bradyrhizobium japonicum. It can be used with:
Garden peas, including shelling, snap, and snow peas
Sweet peas
Lima beans
Soybeans
Fava beans
Southern peas
Asparagus beans
Common beans such as snap beans
Peanuts
Sunn hemp
Vetch (Vicia sp.) including Hairy Vetch, but not Crown Vetch.
Late Spring Sale
We’re currently having a late spring sale. Our Guard-N Inoculant is 20% off! Order yours today to ensure that your beans, peas, peanuts, and other legumes thrive this season.
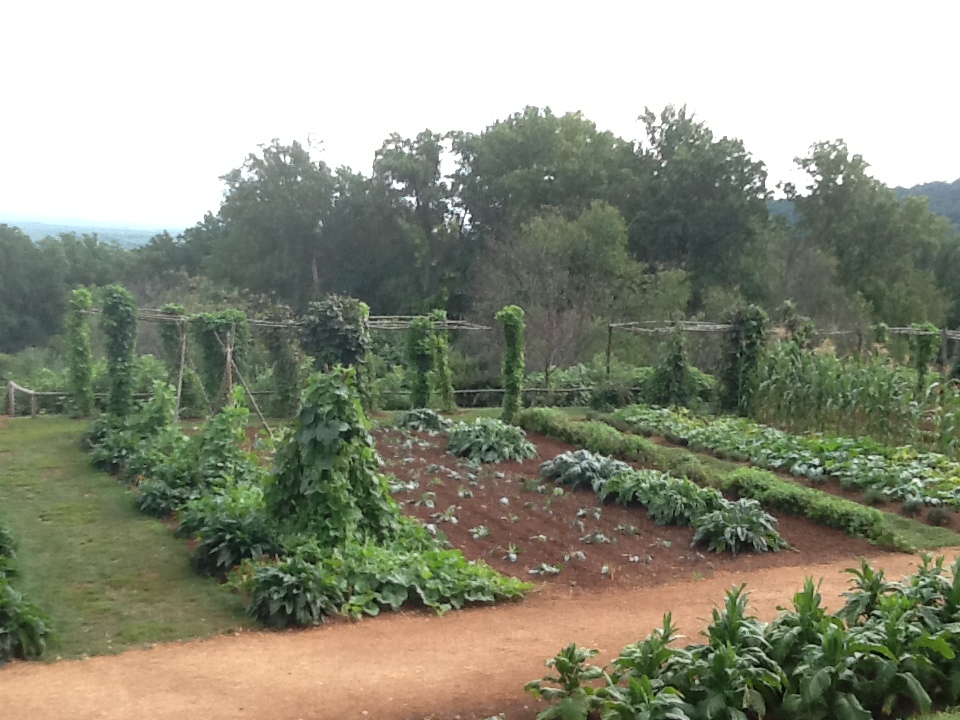
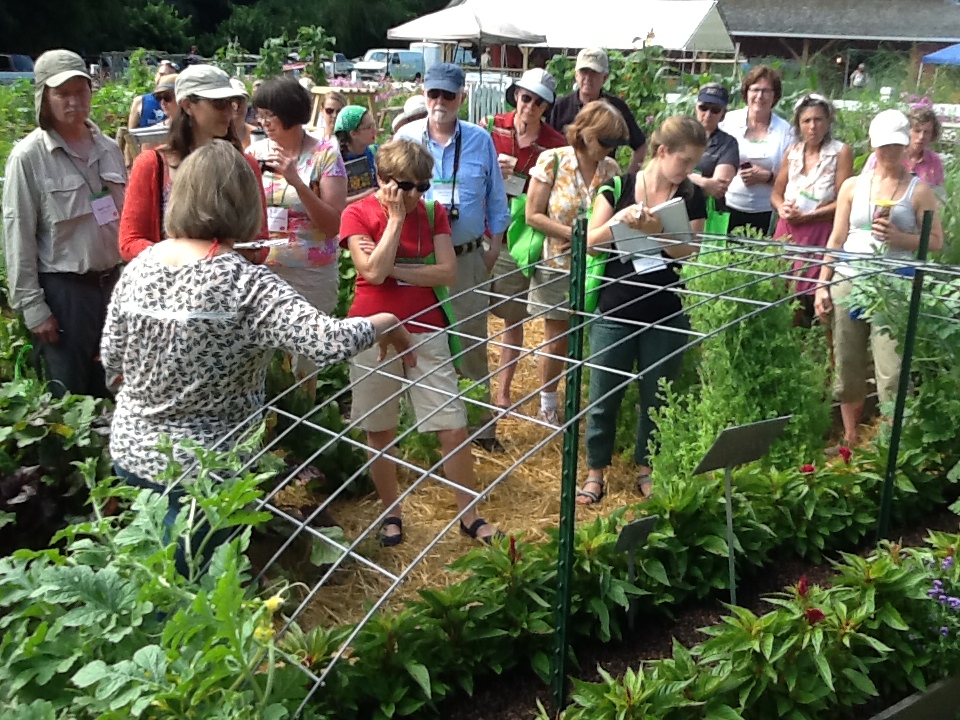
Traditional wooden vegetable garden trellising at Thomas Jefferson’s Monticello
In my dreams of a picturesque garden there are always trellises. They may bring to mind quaint little fairy tale cottages, but trellises aren’t just for their good looks. There are so many plants that can be grown on a trellis and so many reasons to grow them that way.
Why trellis?
Trellising saves resources.
Want to grow more vegetables in little spaces? Grow up! One of the easiest ways to make the best use of small garden spaces is by growing plants on trellises. Plants like pole beans are extremely productive and can be grown in narrow rows if trellised.
Trellised plants also use less water. Instead of watering an entire sprawling plant you can just water the base where the plants roots are located.
Trellises add structure.
Adding structure and height to a garden is often done to make gardens more beautiful. but there are other benefits too. Song birds will appreciate having places to land in your garden and they can help control insect populations.
Having the plants up off the ground also increases air flow and can help minimize plant diseases.
Trellises add shade.
Trellising plants can also help you add much needed summertime shade. A vining vegetable crop like cucumbers can be grown on a slanted trellis above a bed of a cool weather vegetable like lettuce, thereby helping you to grow a late season crop. Deciduous perennials (those that drop their leaves in the fall) can be grown on trellises on the southern side of houses to shade the home in the heat of summer and let the sun through in the winter. Some plants, like pole beans, gourds, and flowers like morning glories, have such long vines they can easily cover small structures (like teepees) making excellent summer forts for kids.
Trellised plants are easier to harvest.
Vegetables on trellises also tend to be easier to harvest. Instead of searching through a sprawling jungle of squash plants, you can easily spot them hanging from a trellis. Plus there’s little or no bending over. The fruits also tend to be cleaner and more uniform, perfect for market growers.
What can be trellised?
Decorative wrought iron trellis at Atlanta Botanical Garden
Many plants do well on a trellis and some require one. Below are some of the vegetables, flowers, and perennials that make ideal candidates for trellising.
There are tons of trellis designs and it can be hard to choose. The major deciding factors will be your garden’s style, your budget, the materials you have on hand, and which plants you plan to trellis. Trellises can be whimsical, practical, or a mix of both. They can be shaped as arches, forts for children, or simple fences.
Use natural materials.
Many people choose to make simple teepees like these which can be made from bamboo, straight saplings, or branches, and held together with twine or wire. There are also many different shaped designs using the same materials.
Use fencing.
Cattle panel arch trellis at Heritage Farm
Hog panels or sections of wire fencing are another popular choice. Hog panels and sturdier fencing can be used two ways: as a fence or bent over as an arch.
Purchase or build trellises from lumber.
If you have money to purchase trellises or a knack for woodworking, there are designs for folding trellises that can be stored each season as well as more creative designs. You can also install large trellises in front houses or over patios.
Repurpose junk.
Some people also repurpose old junk into awesome trellises. Things like iron bed frames and gates, old umbrella frames, and old antennas are great for climbing plants.
When designing any trellis it’s important to think about what you’re growing. Is it a permanent trellis for a perennial that will be in the same spot for years or something you’ll want to rotate next year? You’ll also need to decide on the size. Obviously pea plants require smaller trellises than grape vines. Some plants, like pumpkins, melons, and larger squash varieties, will need sturdy trellises to support the immense weight of their fruit.
How do I trellis plants?
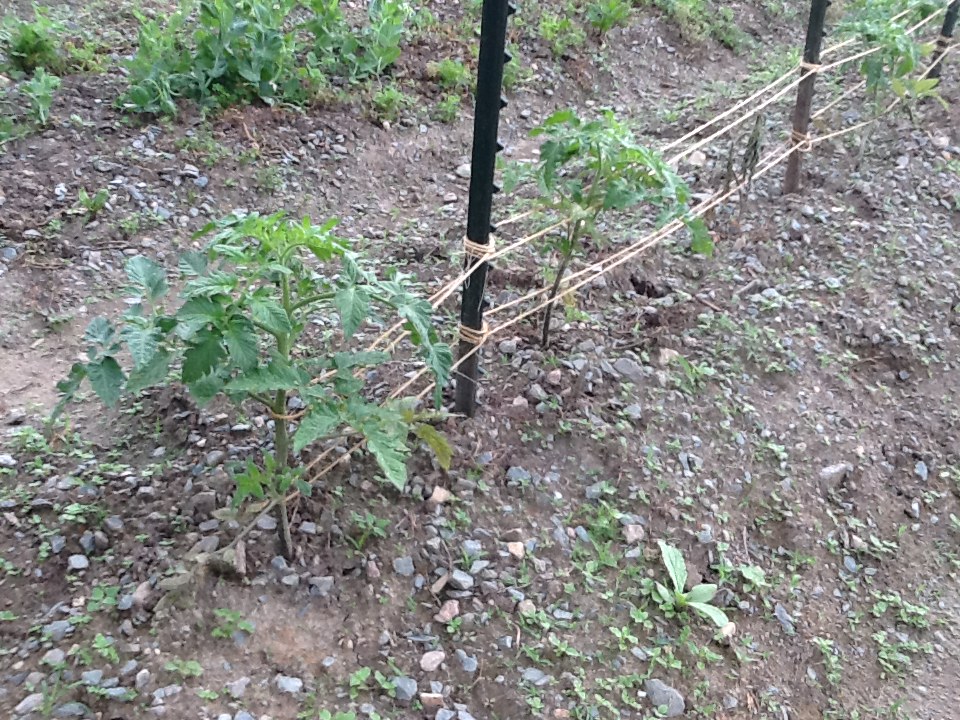
Some plants (including morning glories, beans, and cucumbers) are easy to trellis. Simply sew seeds next to a trellis and they’ll do the work. Some plants, like tomatoes, need a little help: they need to be manually trellised. You can use tomato-specific trellis methods like the “Florida Weave” which surrounds the plants with twine. Or use traditional trellises and attach plants with tomato clips or even old scraps of fabric. Just be sure that your method does not cut into the plant as it grows.
Tomato trellis of string weaving at Twin Oaks Community Farm
For some large-fruited plants like pumpkins, melons, and large squash varieties, you may need extra support. You can create small “hammocks” for each fruit from an old shirt or other stretchy material that can be tied off to the trellis as the vine cannot support the fruit’s mature weight.
If you’re ready for a super productive and beautiful garden this year it’s time to get some trellises ready! The best time to add trellises is before planting, not after, so don’t delay! It’s finally spring and setting up trellises is a great way to get out in the garden.
Want to know more about trellises? Check out these posts:
Once upon a time, when I made my first attempt at putting in a garden and was as clueless as they come, I tried planting some pole beans. I new they needed some kind of trellis to climb and I thought maybe a teepee sort of a thing would be easy. I found a stick of some sort, stuck it in the ground, tied some yarn around the top (that’s right, I used YARN, fine, wool knitting yarn,) and staked the yarn to the ground. Maybe I even used pins to stake it. In case you can’t tell, my background is in textiles, not gardening.
Needless to say, my teepee fell apart almost as soon as the first little bean tendrils reached out for it. The yarn broke and eventually the stick fell over. It would have been funny if it hadn’t been so sad.
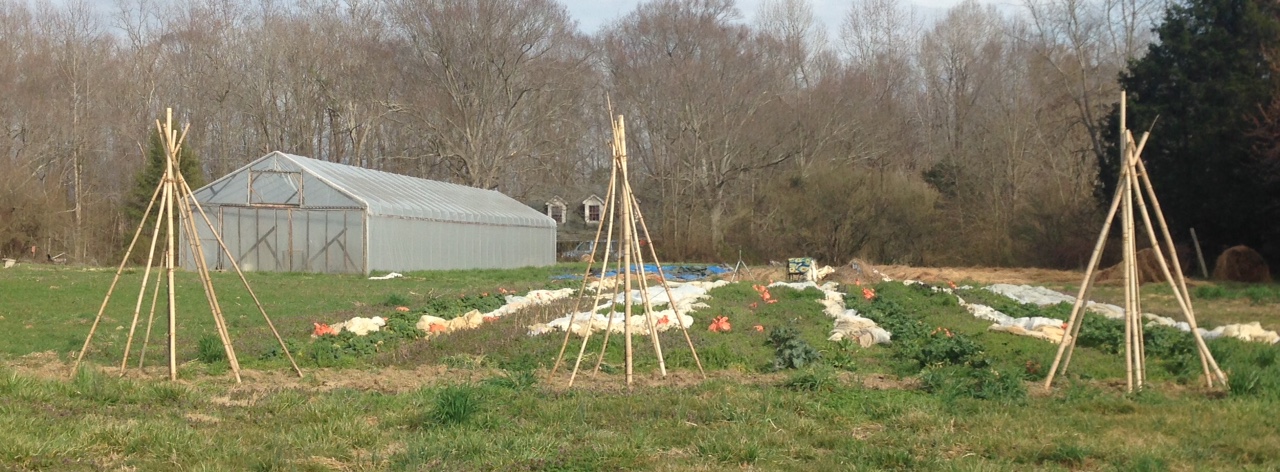
Last week I learned one way to do it right, using a few of the bamboo stalks we have in profusion, so I’d like to share that with you.
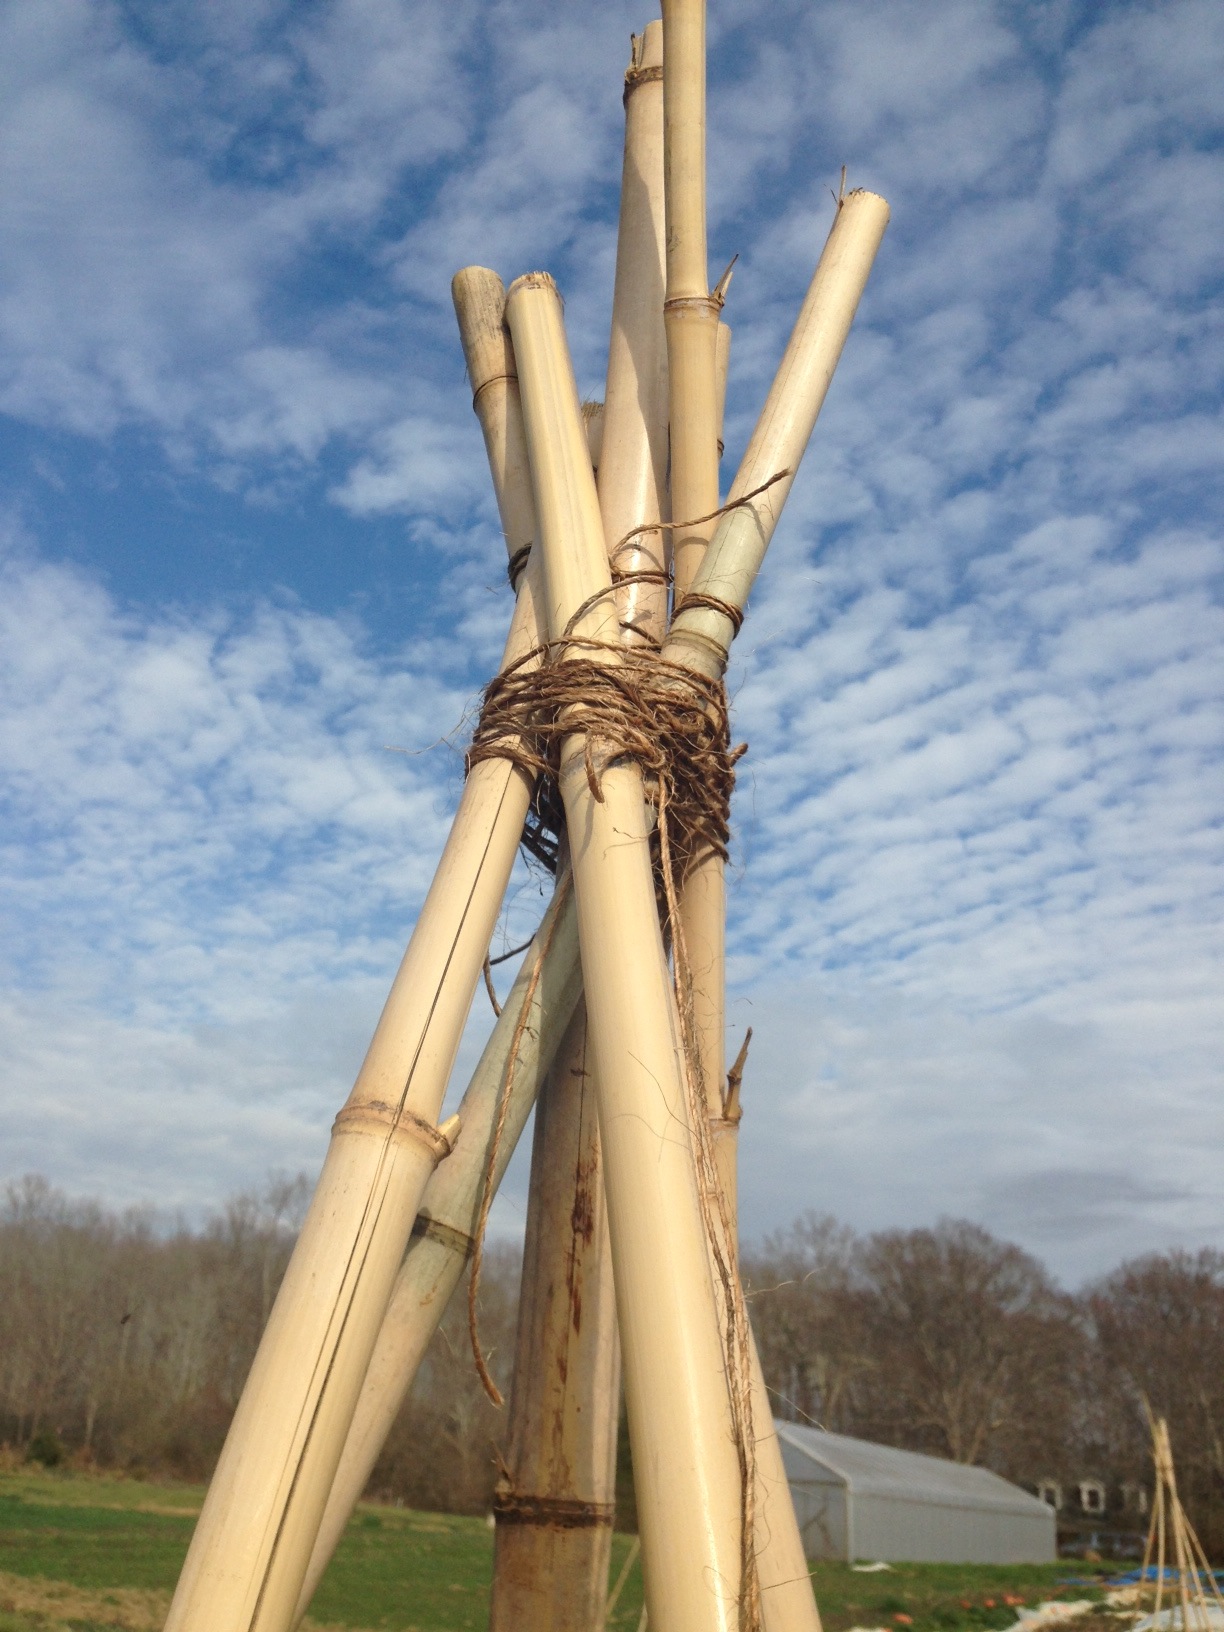
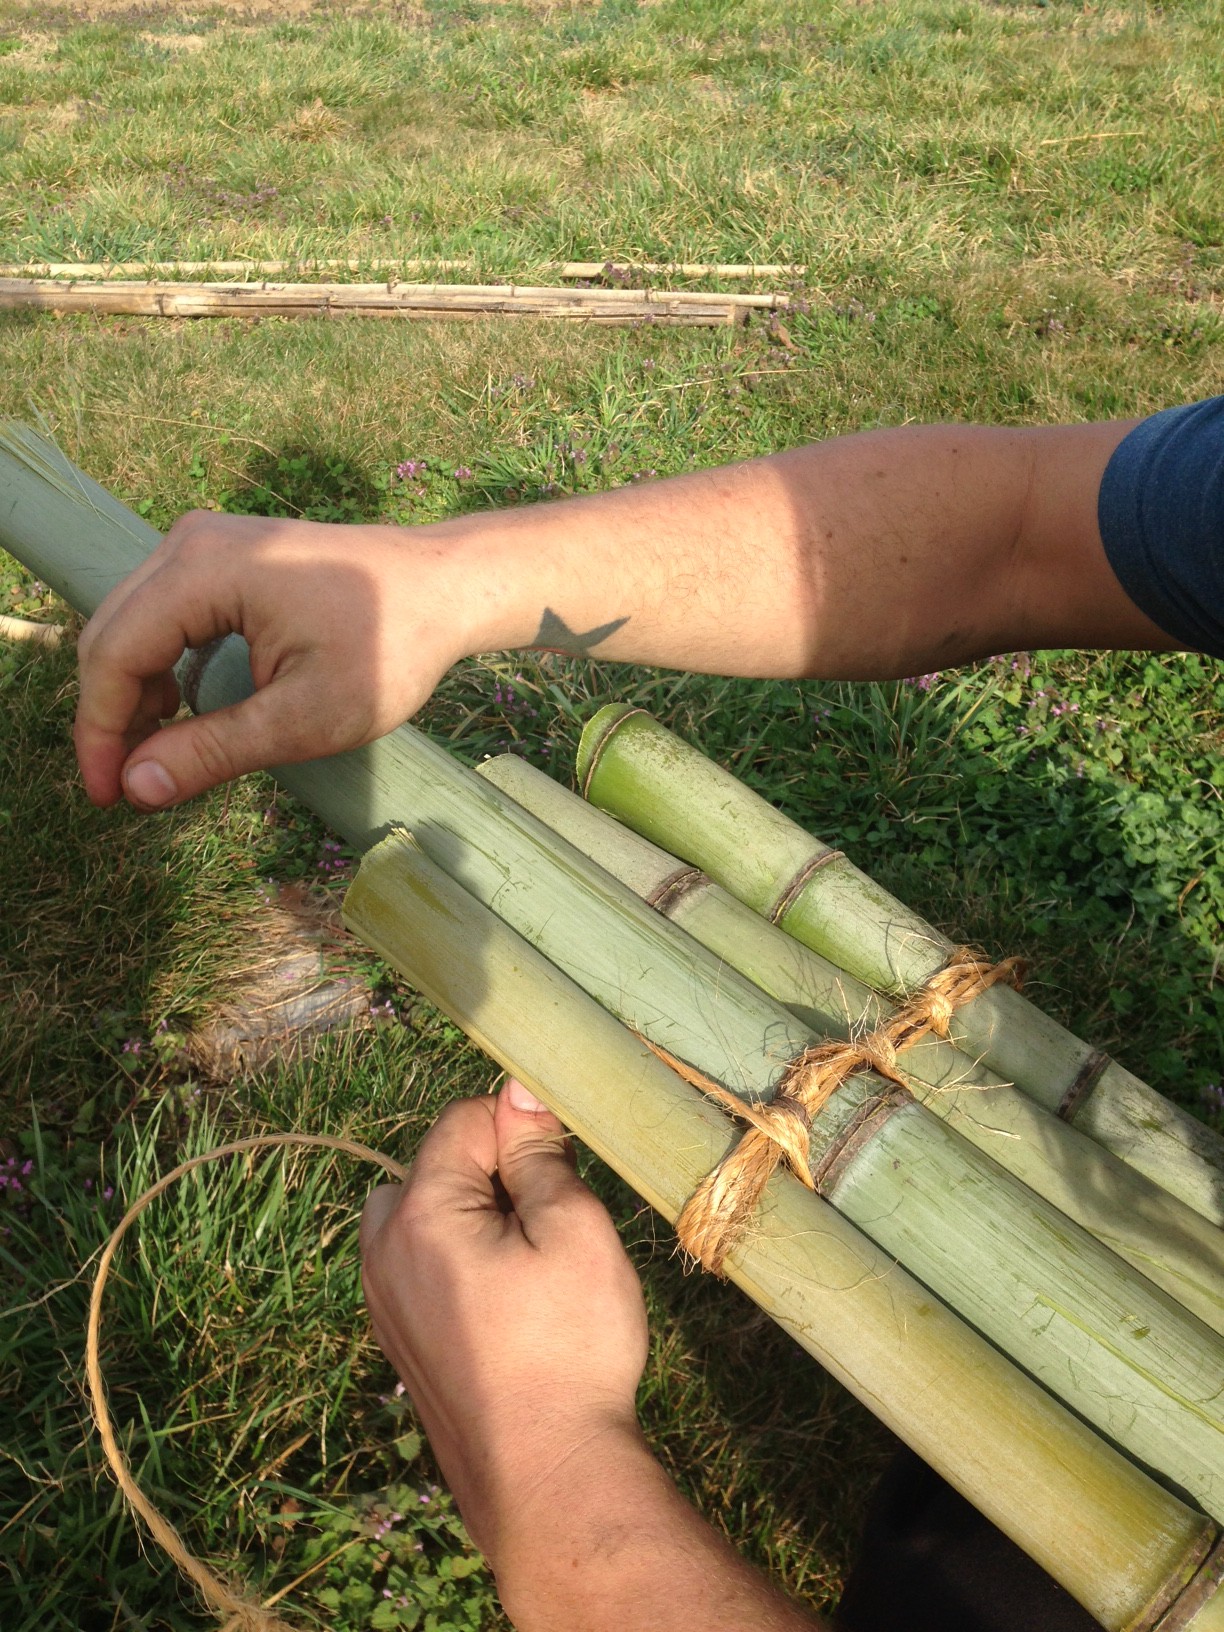
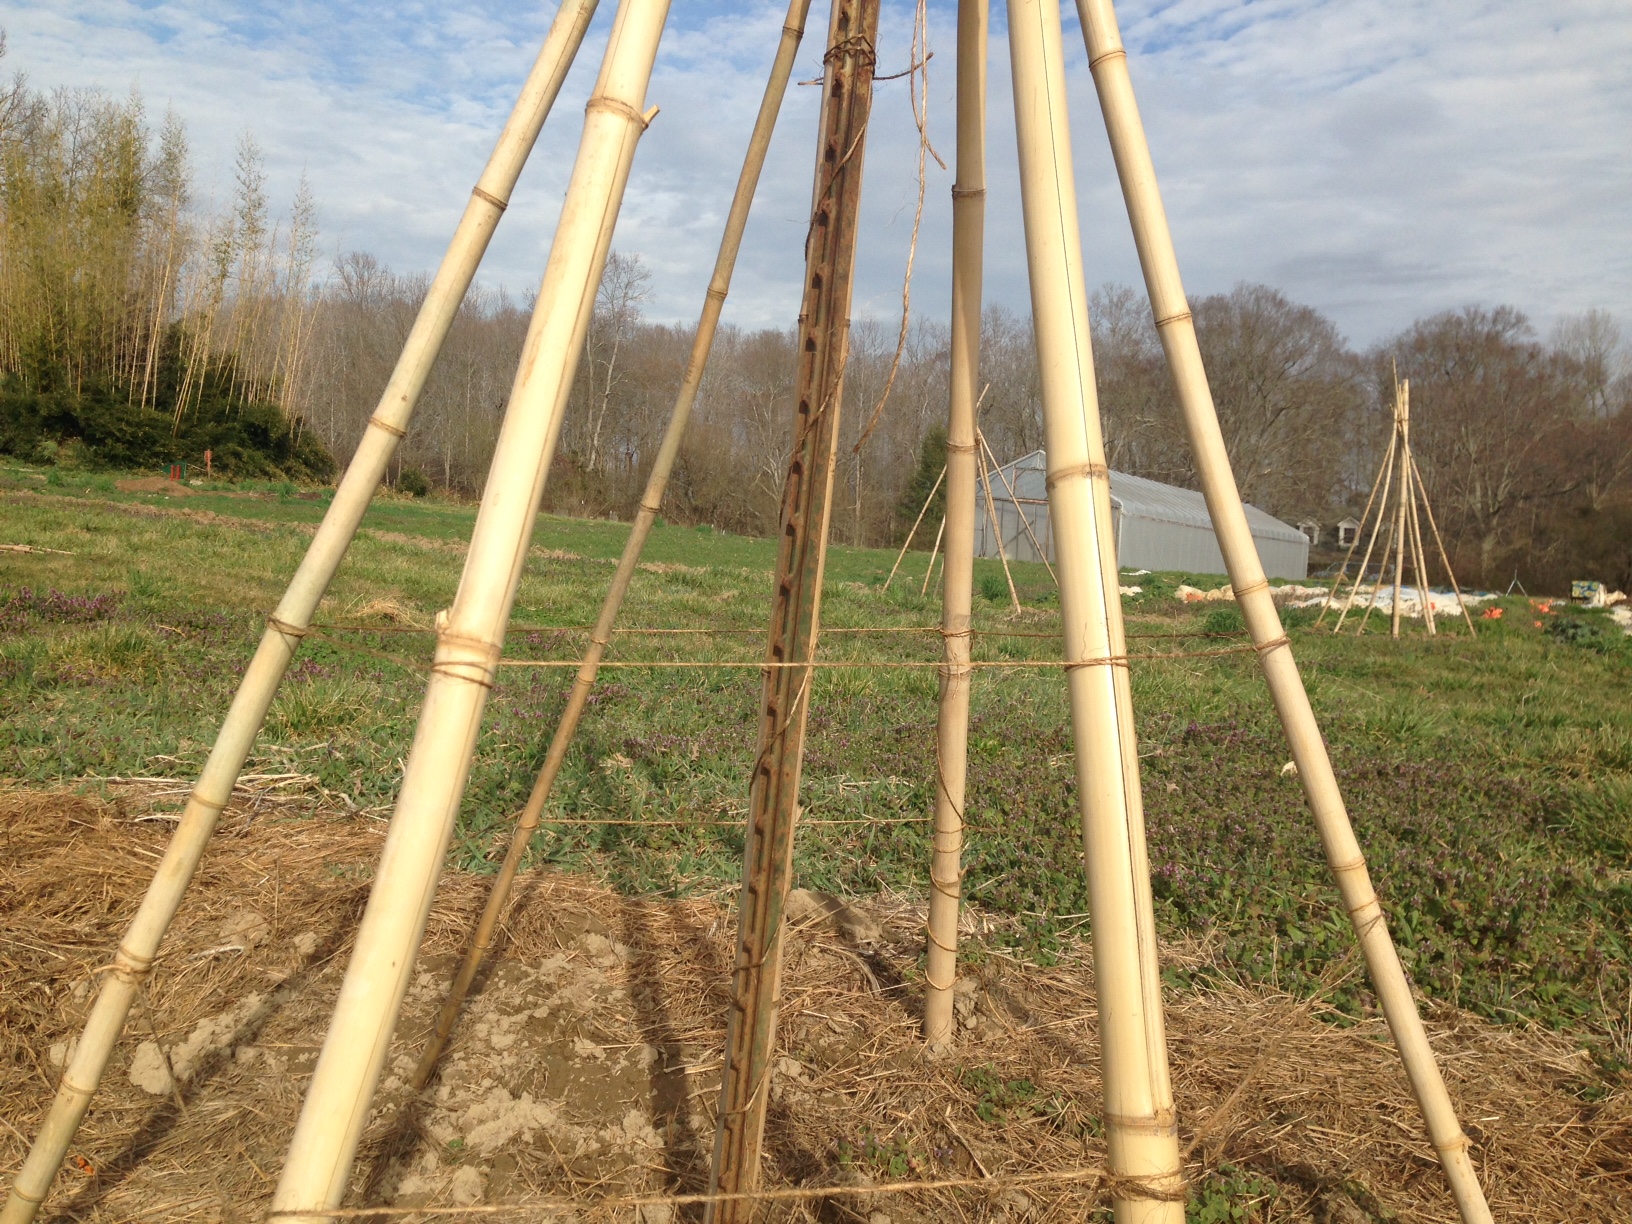
Cut or collect a bunch of bamboo stalks and cut them to around 9′ long, 7 per teepee. Cut off all the branches. We found this was easily accomplished using a machete and whacking from the top down.
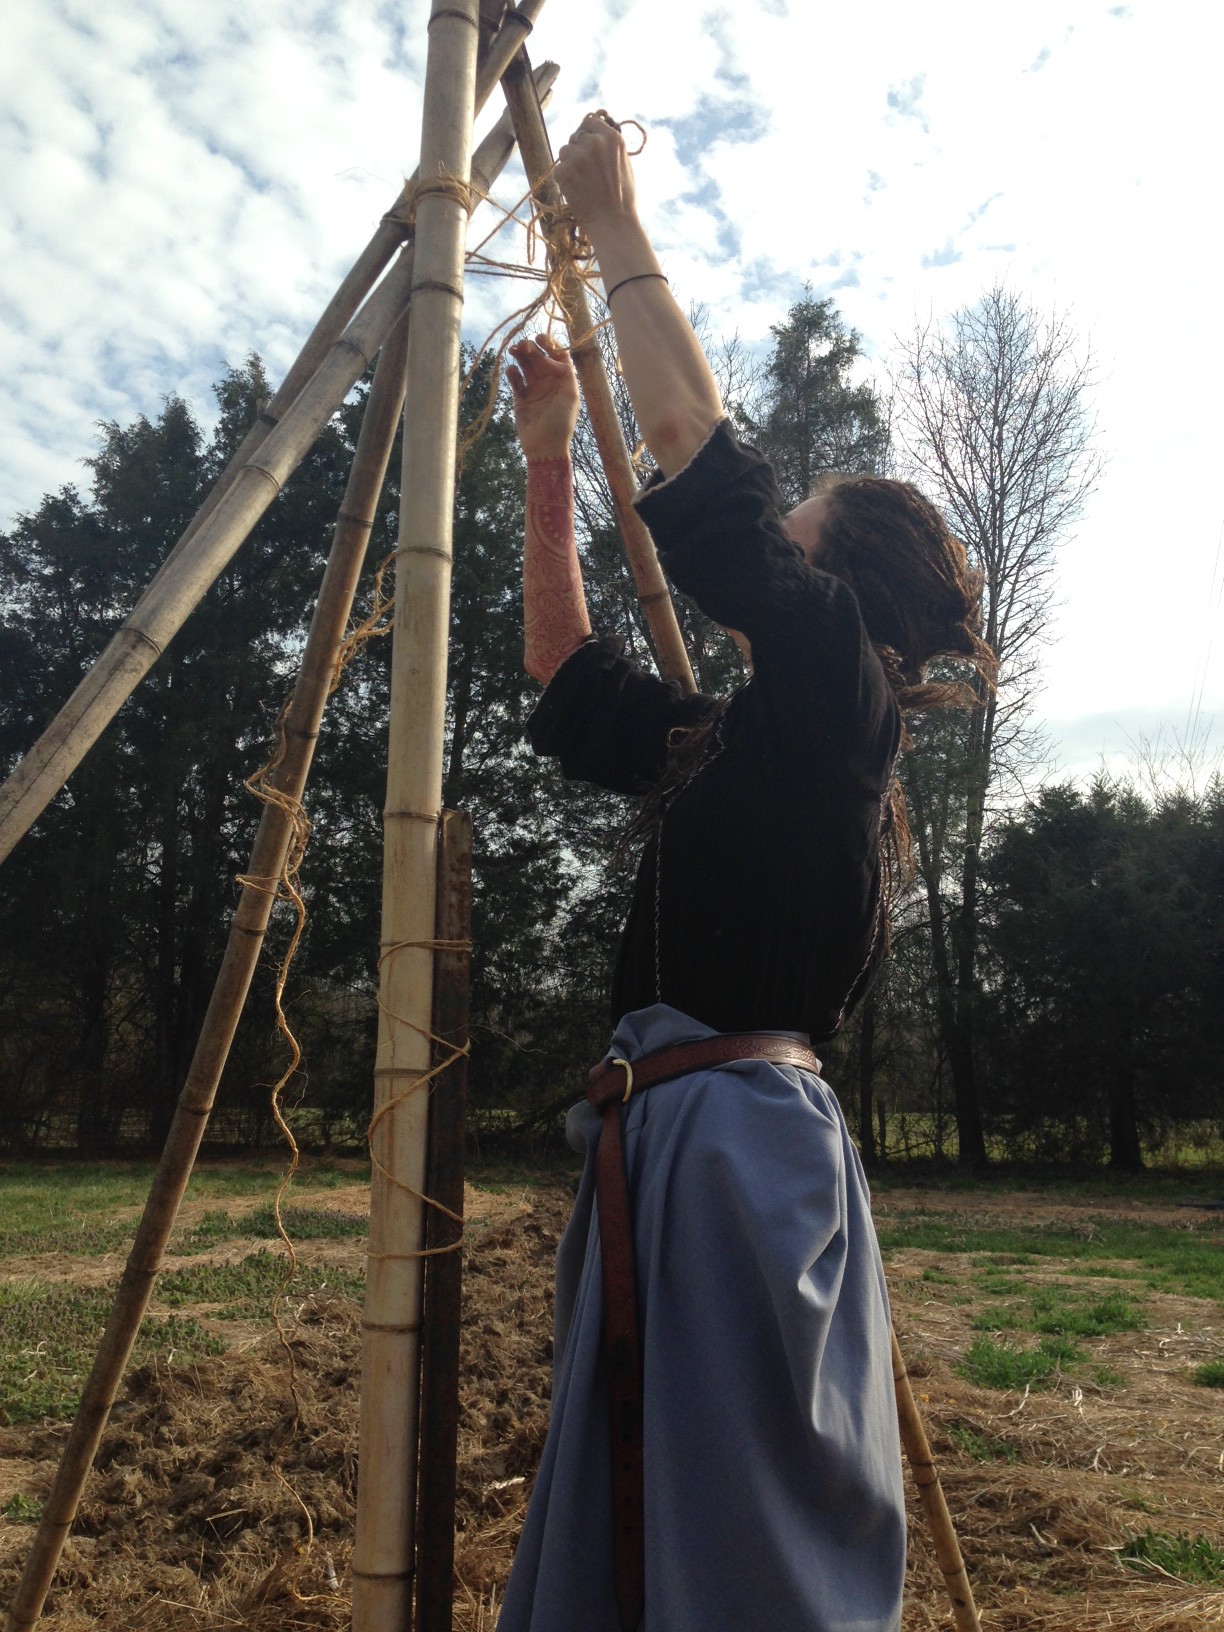
2. Pound a t-post into the ground where you want the center of your teepee to be and tie one of the stalks to it using strong twine, like baling twine.
3. One by one, tie the other six stalks to the center one near the top, with the bottoms propped against the ground about three feet from the center. I did a lot of complicated winding around of the twine to make sure each one was secure, and then wound a bunch more twine around all of them once they were all up.
Alternate method: you can also tie four of the stalks together lying on the ground, with one a little longer than the others to be the center pole, then stand them all up and arrange them in place. Once they’re up you can tie on the remaining three stalks.
4. Wrap twine around each outer stalk at about 1.5′ and 3′ up, going all the way around. This will give the plants something to grab on to as they climb.
5. Now plant your beans or peas! We put in eight in a little circle around the base of each stalk.