Most vegetable gardeners are keenly aware of the fact that what we put into our bodies truly matters. Growing a few medicinal herbs and plants is a great way to expand your garden. While herbs may not replace modern medicine hat can be used to treat some minor ailments and help keep us healthy.
You can create a separate herb garden or mix herbs into a vegetable and/or flower patch, potager style. Many medicinal herbs can actually help attract pollinators and deter pests! Some of these plants can also be grown in pots.
10 Healing Plants to Grow
 Kapoor Tulsi/Holy Basil (O. sanctum) is a relative of common basil and just as delicious. It can be used as a culinary herb in pesto, salads, and other dishes. As a medicinal herb, it’s believed to have antimicrobial and adaptogenic (helps with energy and focus) properties.
The stems, leaves, flowers, and seeds can all be used to create teas either fresh or dried. Another way to use it is to create a tincture.
Holy Basil is an annual and like common basil can be started indoors or direct-seeded. It germinates best around 70°F and should be planted after your last frost.
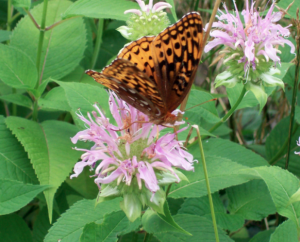
Wild Bergamot (Monarda fistulosa) is an easy to grow ally for both people and wildlife. In addition to being medicinal, wild bergamot is useful for attracting pollinators like bees, butterflies, and hummingbirds to your garden.
It was used by Native American peoples to treat digestive issues and to help treat infections. The steams, leaves, and flowers are all medicinal and can be used to create teas fresh or dried.
As a culinary herb both the leaves and flowers can be used as a garnish, added to salads, or to add unique flavor to other dishes.
Wild bergamot is perennial in zones 4-10. It does best in full sun to partial shade. Keep in mind that it can be vigorous and spread quickly.
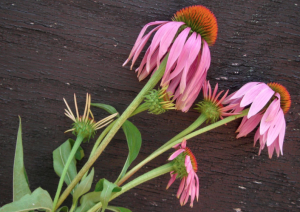
Echinacea (Echinacea purpurea) is probably best known for its immune-boosting properties. It’s commonly used in teas and tinctures to help prevent or shorten colds and flus. Studies have demonstrated that echinacea has immunostimulant, bacteriostatic, and anti-viral activity.
While all echinacea varieties have medicinal benefits Echinacea purpurea is probably the easiest to grow. Unlike other varieties, purpurea seeds don’t require cold stratification. They’re perennial in zones 3-9 and can be started indoors or direct sown. Keep seedlings well weeded.
All parts of the plant including roots, leaves, and flowers can be used to create teas and tinctures. Learn more about growing and using echinacea here.
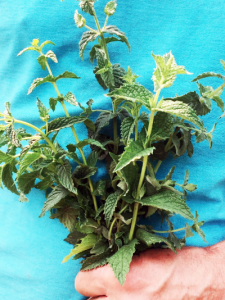 Mint (Mentha sp.) often gets a bad reputation for its uncanny ability to spread but it can be contained and is a worthwhile medicinal herb. When properly harvested and dried mint tea can be used throughout the winter.
It’s great as a calming nighttime tea, a soothing beverage to help calm upset stomachs, or a tea for coughs due to its calmative, expectorant, and spasmolytic properties. You can also use the tea in bathwater for soothing skin inflammation.
Mint can be started from seed, however, it produces plants that vary widely in flavor from spearmint to menthol mint to peppermint. We recommend starting more than you need in pots and then selecting your favorites to plant.
Mint is also easy to propagate from divisions. Just find a friend or neighbor with a clump they don’t mind sharing and use a sharp shovel to cut through a section of roots, separating a cluster for yourself. Planting mint in drier soil can help prevent it from spreading too much.
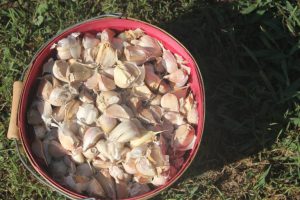 Garlic (Allium sativum) is a wonderful, dual-purpose addition to any garden. It can be used as a culinary or medicinal herb and helps to deter pests!
Garlic has been used as medicine for its antibacterial and anti-inflammatory properties for centuries. It’s often found in popular cold and flu remedies like fire cider.
Garlic should be planted in well-drained, loose soil. Using a garden fork before planting is a great idea with garlic. Avoiding damage to the husk as much as possible, separate the cloves. Plant them tip-up, 6 inches apart. They should be covered with about 1 1/2 inches of soil in southern climates and about 3-4 inches of soil in northern climates.
Mulch heavily (especially in northern climates) with leaves, straw, hay, grass clipping, etc. Keep garlic watered, weeded, and mulched for best results.
For more information check our post Beginners Guide to Growing Great Garlic, Perennial Onions, and Shallots.
Note that elephant garlic isn’t true garlic and may not have the same medicinal properties.
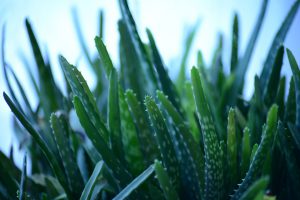 Aloe (Aloe vera; A. barbadensis) is so much more than a decorative houseplant. It’s a powerful medicinal plant that you can grow even if you’re an apartment dweller.
Aloe is great for treating mild skin issues like burns (including sunburn), rashes, abrasions, and stings. Just slice open a leaf and use the gel inside to rub on the affected area.
Aloe plants make lots of “babies” that can be easily be rooted in a new pot. Check with friends and family to see if you can get an aloe start.
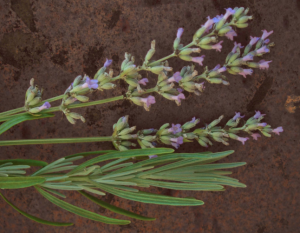 Lavender (Lavandula vera) is another herb with a long history of medicinal use and for good reason. Lavender can be used to help treat anxiety, depression, stress-headaches, and digestive issues. It’s also wonderful for soothing minor skin irritations and burns.
Use lavender buds fresh or dried in teas or baths. In tea, it can have a strong flavor. It’s often blended with other calming herbs like chamomile or lemon balm. You can also sew dried buds into sachets for their calming, fresh scent and to deter moths and other insects.
Lavender is perennial in zones 5-10 and can be grown from seeds with a bit of effort. It can take up to 30 days to germinate and should be started in a slightly alkaline sterile medium. Transplant lavender into a bed with good drainage and wind protection. It can also be grown in pots.
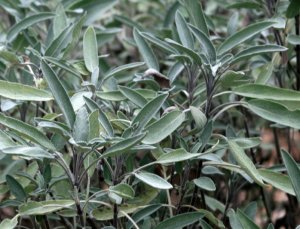 Sage (Salvia officinalis) is astringent and antibacterial. It was traditionally used as a digestive or nerve tonic.
Typically it’s added to a variety of dishes both for flavor and to aid with digestion. However, you can also use sage to create an oxymel which is a mixture of vinegar, honey, and herbs. Check out this recipe.
Sage is perennial in zone 4-10 and can be transplanted or direct-seeded. For apartment dwellers, sage is one of those awesome herbs that tolerates container life well.
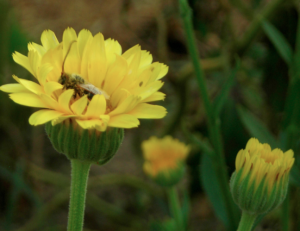
Calendula (Calendula officinalis) is most often used for healing skin ointments. The flowers are full of resin that can be incorporated into other oils for treating rashes, burns, and dry skin.
It can also be taken orally as a tea or tincture for digestive issues. Additionally, the flowers are sometimes used as a substitute for saffron and can be used as a natural food dye.
Calendula is an easy to grow annual. Start indoors or direct seed, just be sure the seeds are cover because they need darkness to germinate. Calendula does best in full sun.
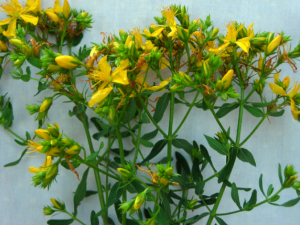
St. Johnswort (Hypericum perforatum) has Anti-inflammatory, anti-viral, and anti-depressant properties. Unfortunately, drying degrades these properties so it must be used fresh or preserved in other ways.
St. Johnswort can be used as a tea, tincture, oil, or salve. This post covers all the ways that you can use this plant.
Transplant or direct seed in the spring or fall. St. Johnswort needs to be stratified and can take up to 30 days to germinate. It’s a hardy perennial that should be grown in full sun.
Grow a few of these herbs this year to start a medicine garden of your own! If you’re invested in learning more about herbal medicine check out The Chestnut School of Herbal Medicine or The Herbal Academy.