Tag Archives: heirloom corn

Harvesting, Drying, & Eating Popcorn

Cherokee Long Ear Small

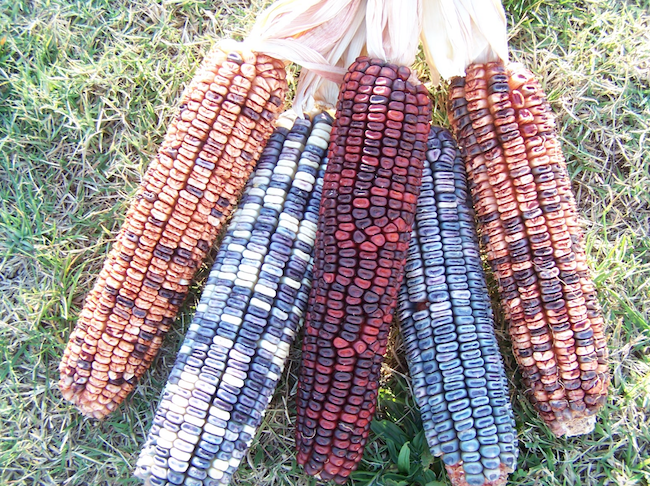
Though the grocery store may only carry yellow or white popcorn home gardeners know that popcorn comes in variety of colors. You may also know that popcorn can be used in a variety of ways. In fact, popcorn was probably first ground like other flour corns to make bread. Native Americans had domesticated popcorn by 5000 B.C.E. but as far as currently available archeological evidence suggests, popping popcorn as we do today didn’t become popular until the 1820s.

Check out the PBS article, History of Popcorn, for more interesting information.

Harvesting

Popcorn should be left to dry in the field as long as possible. When you harvest, the husks should be completely dry and the kernels hard. You should then dry your corn as soon as possible.

Drying

Once you’ve harvested your popcorn, it should be hung somewhere cool and dry. An easy way to do this is to pull the husks back, remove the strings, and hang them on a line with clothespins either indoors or under cover. Some folks also have luck completely removing the husks and hanging mesh bags of ears. Especially if you live in a humid climate, be sure to move the bags around every few days and check for signs of mold or mildew where the ears of corn touch eachother.

Popcorn needs to dry until it reaches an ideal moisture content of between 13 and 14%. This level of moisture is key to getting good “pops.” While your popcorn is hanging to dry test a few kernels once or twice a week. When they pop well you can move your popcorn to storage.

If you just can’t wait to eat a bit you can speed up the process with a dehydrator. Shell a few ears and lay the kernels on a dehydrator tray. Dehydrate between 120-130°F, checking few hours until it’s popping well.

Storing

To save space, shell your popcorn and place it in airtight containers. It will keep for several years.

If stored popcorn won’t pop it may have become too dry. Don’t worry though, you can add moisture to make it pop again. Fill a quart jar with popcorn and 1 tablespoon of water. Shake occasionally until all the water is absorbed. Check to see if it will pop every 3 to 4 days and keep adding water 1 tablespoon at a time until it pops well.

Popping

Making popcorn on a stovetop is surprisingly easy. Begin by heating a large, thick-bottomed saucepan or dutch oven with lid with about 3 Tbs of olive oil in it over medium heat. Once hot, the oil should cover the bottom of the pan. Then add 3 kernels to the pan and place the lid on.

When all the kernels have popped, add 1/3 cup of kernels and place the lid back on. Ocassionally slide or shake the pan back and forth redistributing the popcorn. When the popping slows to a few seconds between pops remove your pan from the heat and enjoy!

Other Uses

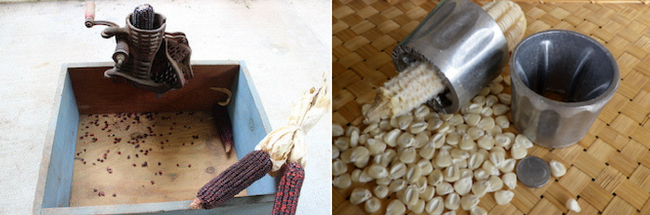
Popcorn also makes wonderful cornmeal or grits. Check out our article about proccessing flour corn for tips. You can also make popcorn pie!

Additionally popcorn can be eaten like sweet corn in what’s called the “milk stage.” When the husks are still green but the silks have begun to brown check an ear or two to see how the kernels look. For colored popcorns it’s ready just before it takes on darker colors. You can also check by tasting it or by piercing a kernel with a fingernail. If white liquid comes out it’s ready for fresh eating.

Processing Flour Corn at Home

Kentucky Rainbow (Daymon Morgan’s Knt. Butcher) Dent Corn

Today many people grow flour corn solely for decoration. Flour corn varieties certainly are beautiful but they have so much more going for them than their looks! Many Native American cultures relied on these corns as a staple food. Today they’re still an excellent way to produce and eat a more local diet. They really aren’t difficult to process into delicious cornmeal, flour, or grits.

Harvesting

Most flour corns have two numbers listed for “days to maturity.” The first number or set of numbers is when the corn will be ready to harvest in it’s milk stage like you would sweet corn. You’ll know it’s at this stage when the tassels turn brown. It won’t be nearly as sweet as modern hybrid sweetcorn however it’s still quite tasty when roasted with butter. The second number or set is when your corn will be fully mature and ready to harvest for flour. The husk should be papery and dry.

You should harvest your corn on a dry day before your first fall frost. Then you can pull the husk back from the corn and hang them so the kernels can finish drying completely. Traditionally corn husks were sometimes braided or tied together to hang the corn in small bundles. You’ll know when the corn is completely dry because the kernels will crack instead of squishing under pressure. 

It should be noted that gourd seed and popcorn varieties can also be processed into flour and Native Americans often used them this way.

Shelling & Winnowing

When your corn is dry it can be processed. The first step is to shell your corn. This can be done by hand or with a corn sheller. Doing it by hand can be time consuming and tiring if your doing anything but a very small quantity. At SESE we offer two handheld corn shellers, one for flour corns (above right) and one for popcorns. You can also sometimes find larger corn shellers like the one pictured above left at antique stores, flea markets, or auctions. 

Once your corn has been shelled odds are they’ll be bits of corn cob mixed in which is also called chaff. To remove this you’ll need to winnow your corn. Don’t worry though it’s easy and there’s no special equipment required. Simply place a quantity of your corn into a large bowl or bucket. Then place an empty one in front of a fan. A household box fan will work perfectly. Then slowly pour your corn into the bucket in front of the fan. The fan will blow away the lighter pieces of material while the corn will fall into the other container. You may have to repeat this several times before the corn is clean.  

Nixtamalization

It may seem like you should now be able to just grind your corn and eat it there’s actually another step. In order to get the all the available nutrition from corn it needs to be nixtamalized. Traditionally this was done by soaking or boiling the corn in lime water. Native Americans in North America used wood ash for this but today it’s common to use pickling lime which should be easily available with home canning supplies.

Here’s what you’ll need:

  • 1/8 cup of pickling lime
  • 1 1/2 quarts of water
  • 1lb corn

Pickling lime is caustic so rinse it off quickly if it gets on your skin and avoid getting any in your eyes. Be extra careful if there are small children around.

Dissolve your lime in your water and combine the lime water and corn and bring them to a boil. Avoid aluminum pots as they react with the lime. Turn off the heat and let your corn soak overnight. In the morning rinse your corn well in a stainless steel colander. While it’s rinsing rub off some of the corn’s outer layer (this will give you a finer flour).

The corn can then be used whole in soups or stews or ground into flour. Depending on what you’re using to grind your corn you can grind it wet or dry it to grind later by laying it out in a single layer on a screen or using a dehydrator.

For a more in depth look at the history and importance of Nixtamalization check out this article from Cook’s Illustrated.

**For most people this corn isn’t going to make up a large part of your diet so it won’t be harmful to skip this step if you feel you need to.

Grinding

Traditionally corn was ground in a mortar and pestle or with a grinding stone. Thankfully today there are a variety of home grain mills available that are suitable for grinding corn. You can find ones that are hand crank or electric, ones with stone grinding wheels and ones with metal, and mills that can handle wet, oily products and those that can’t. What you choose will depend on your budget and goals. 

Depending on what you’re hoping to make with your corn (like fine flour for tortillas or courser corn for grits) you’ll need to set your mill to achieve a specific coarseness. 

Some mills may require more passes to produce fine flour. If your mill is taking multiple passes it may be helpful to strain the corn through a wire mesh colander and run the larger pieces back through separately rather than the entire batch.

Storage

If you grow an ample amount of corn your going to want to store some for later. Flour corn is best stored at two stages. First it can be stored on the ear once it’s completely dry. You can even leave it hanging if you want. Alternatively, to save room you can store it in containers after it has been shelled and winnowed. It will stay fresh much longer as whole kernels than if you grind it into flour. 

Adding flour corn to your backyard garden is a great way to produce more than just fresh produce for yourself. It’s easy to grow and store for use throughout the year and making your own grits or tortillas can be a great family activity. 

Pin it for later.